Amazon EVS makes the actual deployment surprisingly straightforward — you fill in your environment details through the AWS Console wizard, click deploy, and the automation takes it from there. Once initiated, a full VCF environment typically comes up in around 3 hours. Behind the scenes, AWS provisions the underlying EC2 bare-metal infrastructure and then hands off to the native VMware VCF deployment engine — Cloud Deployer — which builds out vCenter, SDDC Manager, NSX, and all VCF components exactly as it would in an on-premises deployment.
What makes or breaks a successful deployment is everything before you click deploy. Just like an on-premises VCF deployment, EVS expects a fully prepared environment — DNS resolving correctly, networking in place, IP plans finalized, licenses procured. The difference is that on-premises you have time to fix things mid-deployment; with EVS, the automation validates prerequisites upfront and will fail fast if anything is missing or misconfigured. Getting the prep right the first time is the entire point of this guide.
This guide covers every prerequisite required before submitting an Amazon EVS environment creation request. Complete all 10 steps in order — EVS will validate most of these during bring-up and fail with a specific error if any are missing.
| Step | Prerequisite | Pre-Create Required? |
|---|---|---|
| 1 | AWS Account & Business Support Plan | Yes |
| 2 | IAM Permissions & Service-Linked Role | Yes |
| 3 | IP Address Planning | Plan only |
| 4 | VPC & Service Access Subnet | Yes |
| 5 | Route 53 Private Zone & Inbound Resolvers | Yes |
| 6 | DHCP Options Set | Yes |
| 7 | VPC Route Server & BGP (AWS side) | Yes |
| 8 | On-Demand Capacity Reservation (ODCR) | Yes |
| 9 | VCF Licensing (256-core key + vSAN key) | Procure before bring-up |
| 10 | EC2 Key Pair | Yes |
1 Step 1: AWS Account & Support Plan
Amazon EVS enforces a hard requirement on your AWS support tier. Environment creation will fail if this is not in place.
1.1 Required Support Plan
Your AWS account must be enrolled in AWS Business Support or higher (Enterprise On-Ramp or Enterprise Support). Developer Support is not sufficient. Verify your plan at AWS Console › Support › Support Plans.
1.2 Supported AWS Regions & Availability Zones
Amazon EVS is available in select regions. All EVS resources — VPC, subnets, hosts, and the Route Server — must reside in the same single AZ. EVS does not support multi-AZ deployments within a single environment. Choose your target AZ before proceeding and plan all subnets accordingly.
1.3 Transit Gateway for On-Premises Connectivity
If your EVS environment needs to communicate with on-premises networks, an AWS Transit Gateway is required. AWS does not support Direct Connect Private VIFs, VGW-based Site-to-Site VPNs, or VPC peering for EVS underlay connectivity — all external network paths must go through Transit Gateway.
2 Step 2: IAM Permissions & Service-Linked Role
EVS uses two distinct IAM constructs: a service-linked role that EVS manages automatically, and an identity-based policy that must be attached to the user or role initiating the deployment.
2.1 EVS Service-Linked Role
AWS automatically creates the AWSServiceRoleForEVS service-linked role on your first EVS operation. This role allows the EVS service to create and manage EC2 instances, network interfaces, subnets, and Secrets Manager secrets on your behalf. You cannot edit its permissions, but the deploying user must have permission to create it if it does not yet exist:
# Attach to the user/role that will create the EVS environment
{
  "Effect": "Allow",
  "Action": "iam:CreateServiceLinkedRole",
  "Resource": "arn:aws:iam::*:role/aws-service-role/evs.amazonaws.com/AWSServiceRoleForEVS",
  "Condition": {
    "StringLike": { "iam:AWSServiceName": "evs.amazonaws.com" }
  }
}
2.2 User / Role Permissions
The principal creating the EVS environment needs the following permissions at minimum. Scope resource ARNs as tightly as practical for your environment.
| Service | Required Actions |
|---|---|
| EVS | evs:* |
| EC2 | DescribeVpcs, DescribeSubnets, DescribeInstances, RunInstances, TerminateInstances, CreateSubnet, DeleteSubnet, CreateNetworkInterface, DeleteNetworkInterface, DescribeCapacityReservations |
| Secrets Manager | CreateSecret, UpdateSecret, DeleteSecret, DescribeSecret |
| KMS | DescribeKey, ListAliases (if using customer-managed keys) |
| IAM | CreateServiceLinkedRole (scoped to EVS SLR ARN) |
AmazonEVSEnvironmentPolicy which covers the minimum permissions required to call CreateEnvironment.
3 Step 3: IP Address Planning
Plan all CIDRs before creating any AWS resources. Overlapping ranges will cause EVS bring-up to fail and cannot be corrected without redeployment. Start with the VPC CIDR (the outer boundary), then plan the VLANs that will live inside it.
3.1 VPC CIDR
The VPC CIDR is the outer boundary for every VLAN EVS will create. Choose it before anything else — it cannot be changed after an EVS environment is deployed into the VPC.
| Requirement | Detail |
|---|---|
| Minimum size | /22 (1,024 addresses) |
| Recommended size | /16 — provides space for all 10 EVS VLANs, Service Access Subnet, future expansion VLANs, and non-EVS subnets in the same VPC |
| Address space | RFC 1918 private only: 10.0.0.0/8, 172.16.0.0/12, 192.168.0.0/16 |
| IPv6 | Not supported — IPv4 only |
| Immutability | Cannot be changed after EVS deployment. Plan generously. |
| VLAN containment | All VLAN CIDRs specified in CreateEnvironment must fall within this CIDR and must not overlap each other or existing subnets |
| On-premises overlap | Must not overlap your on-premises or Transit Gateway-attached networks if you plan to use TGW for connectivity |
3.2 VLAN Address Plan
The table below shows the recommended layout for a 10.0.0.0/16 VPC. Reserve all ranges now — most subnets are created automatically by EVS during bring-up using the CIDRs you supply in the CreateEnvironment request.
| Subnet / VLAN | Purpose | Allowed Size | Pre-Create? | Example CIDR |
|---|---|---|---|---|
| Service Access Subnet | Route Server endpoints, DNS Resolver ENIs | /28 – /24 | Yes — Step 4.3 | 10.0.0.0/24 |
| Host Management VLAN | ESXi host management interfaces | /28 – /24 | No — EVS creates | 10.0.10.0/24 |
| Management VM VLAN | vCenter, SDDC Manager, NSX Managers, NSX Edges | /28 – /24 | No — EVS creates | 10.0.11.0/24 |
| vMotion VLAN | Live VM migration | /28 – /24 | No — EVS creates | 10.0.12.0/24 |
| vSAN VLAN | Storage traffic | /28 – /24 | No — EVS creates | 10.0.13.0/24 |
| Host VTEP VLAN | NSX host tunnel endpoints (Geneve) | /28 – /24 | No — EVS creates | 10.0.14.0/24 |
| Edge VTEP VLAN | NSX Edge tunnel endpoints (Geneve) | /28 – /24 | No — EVS creates | 10.0.15.0/24 |
| NSX Uplink VLAN | Tier-0 north-south BGP peering | /28 – /24 | No — EVS creates | 10.0.16.0/24 |
| HCX Uplink VLAN | (Optional) HCX-IX & HCX-NE traffic | /28 – /24 | No — EVS creates | 10.0.20.0/24 |
| Expansion VLAN 1 | Reserved for future VCF segments | /28 – /24 | No — EVS creates | 10.0.21.0/24 |
| Expansion VLAN 2 | Reserved for future VCF segments | /28 – /24 | No — EVS creates | 10.0.22.0/24 |
CreateEnvironment request. Reserve these ranges now and do not create overlapping subnets in the VPC.
3.3 IP Address Inventory
The table below lists every individual IP address that must be assigned before EVS bring-up. Addresses marked Yes in the DNS Required column must have both forward (A) and reverse (PTR) records resolvable within the VPC — whether via Route 53 private hosted zones or your own DNS servers — before CreateEnvironment is called.
| Hostname | VLAN / Subnet | Example IP | DNS Required |
|---|---|---|---|
| evs-dns-resolver-1 | Service Access Subnet | 10.0.0.10 | No |
| evs-dns-resolver-2 | Service Access Subnet | 10.0.0.11 | No |
| route-server-endpoint-1 | Service Access Subnet | Dynamic | No |
| route-server-endpoint-2 | Service Access Subnet | Dynamic | No |
| esxi-01 | Host Management VLAN | 10.0.10.21 | Yes |
| esxi-02 | Host Management VLAN | 10.0.10.22 | Yes |
| esxi-03 | Host Management VLAN | 10.0.10.23 | Yes |
| esxi-04 | Host Management VLAN | 10.0.10.24 | Yes |
| cloud-builder | Management VM VLAN | 10.0.11.9 | Yes |
| sddc-manager | Management VM VLAN | 10.0.11.10 | Yes |
| vcenter | Management VM VLAN | 10.0.11.11 | Yes |
| nsx-mgr-01 | Management VM VLAN | 10.0.11.12 | Yes |
| nsx-mgr-02 | Management VM VLAN | 10.0.11.13 | Yes |
| nsx-mgr-03 | Management VM VLAN | 10.0.11.14 | Yes |
| nsx-mgr (cluster VIP) | Management VM VLAN | 10.0.11.15 | Yes |
| nsx-edge-01 | Management VM VLAN | 10.0.11.21 | Yes |
| nsx-edge-02 | Management VM VLAN | 10.0.11.22 | Yes |
| nsx-edge-01 uplink | NSX Uplink VLAN | 10.0.16.10 | No |
| nsx-edge-02 uplink | NSX Uplink VLAN | 10.0.16.11 | No |
/28 (14 usable addresses) is the minimum, a /24 is recommended.
variables.tf to match your environment before running terraform apply. The resolver IPs (10.0.0.10 / 10.0.0.11) must match exactly what you configure as domain-name-servers in the DHCP Options Set.
3.4 EVS Networking Constraints
These constraints affect your network design and must be accounted for before you commit to a topology. Review them now before creating any resources.
- Transit Gateway required for external connectivity. Direct Connect Private VIFs, VGW-based Site-to-Site VPNs, and VPC peering are not supported for EVS underlay connectivity. All paths to on-premises or other VPCs must go through Transit Gateway.
- S3 Gateway endpoints are not supported. To access S3 from EVS workloads, use an S3 Interface Endpoint (PrivateLink) — this provisions a private IP in your VPC that EVS workloads route to like any standard network destination, with no route table injection required.
- Security groups do not apply to EVS VLAN subnet ENIs. NACLs are the only packet-level filtering mechanism for EVS traffic.
- IPv6 is not supported. All EVS subnets and VLANs must use IPv4.
- No customer workloads in EVS subnets. EVS-managed VLAN subnets are exclusively for VCF components — do not launch EC2 instances, bastion hosts, or other workloads in them.
4 Step 4: VPC & Service Access Subnet
4.1 Create the EVS VPC
Create a dedicated VPC for the EVS environment. Key requirements:
| Setting | Requirement |
|---|---|
| CIDR Block | Minimum /22 (1,024 addresses). Recommended /16 — provides space for all EVS VLANs, Service Access Subnet, and future growth. Must be RFC 1918 private space. Cannot be changed after EVS deployment. |
| IPv6 | Not supported |
| DNS Hostnames | Must be enabled |
| DNS Support | Must be enabled |
| Tenancy | Default (dedicated tenancy is not supported) |
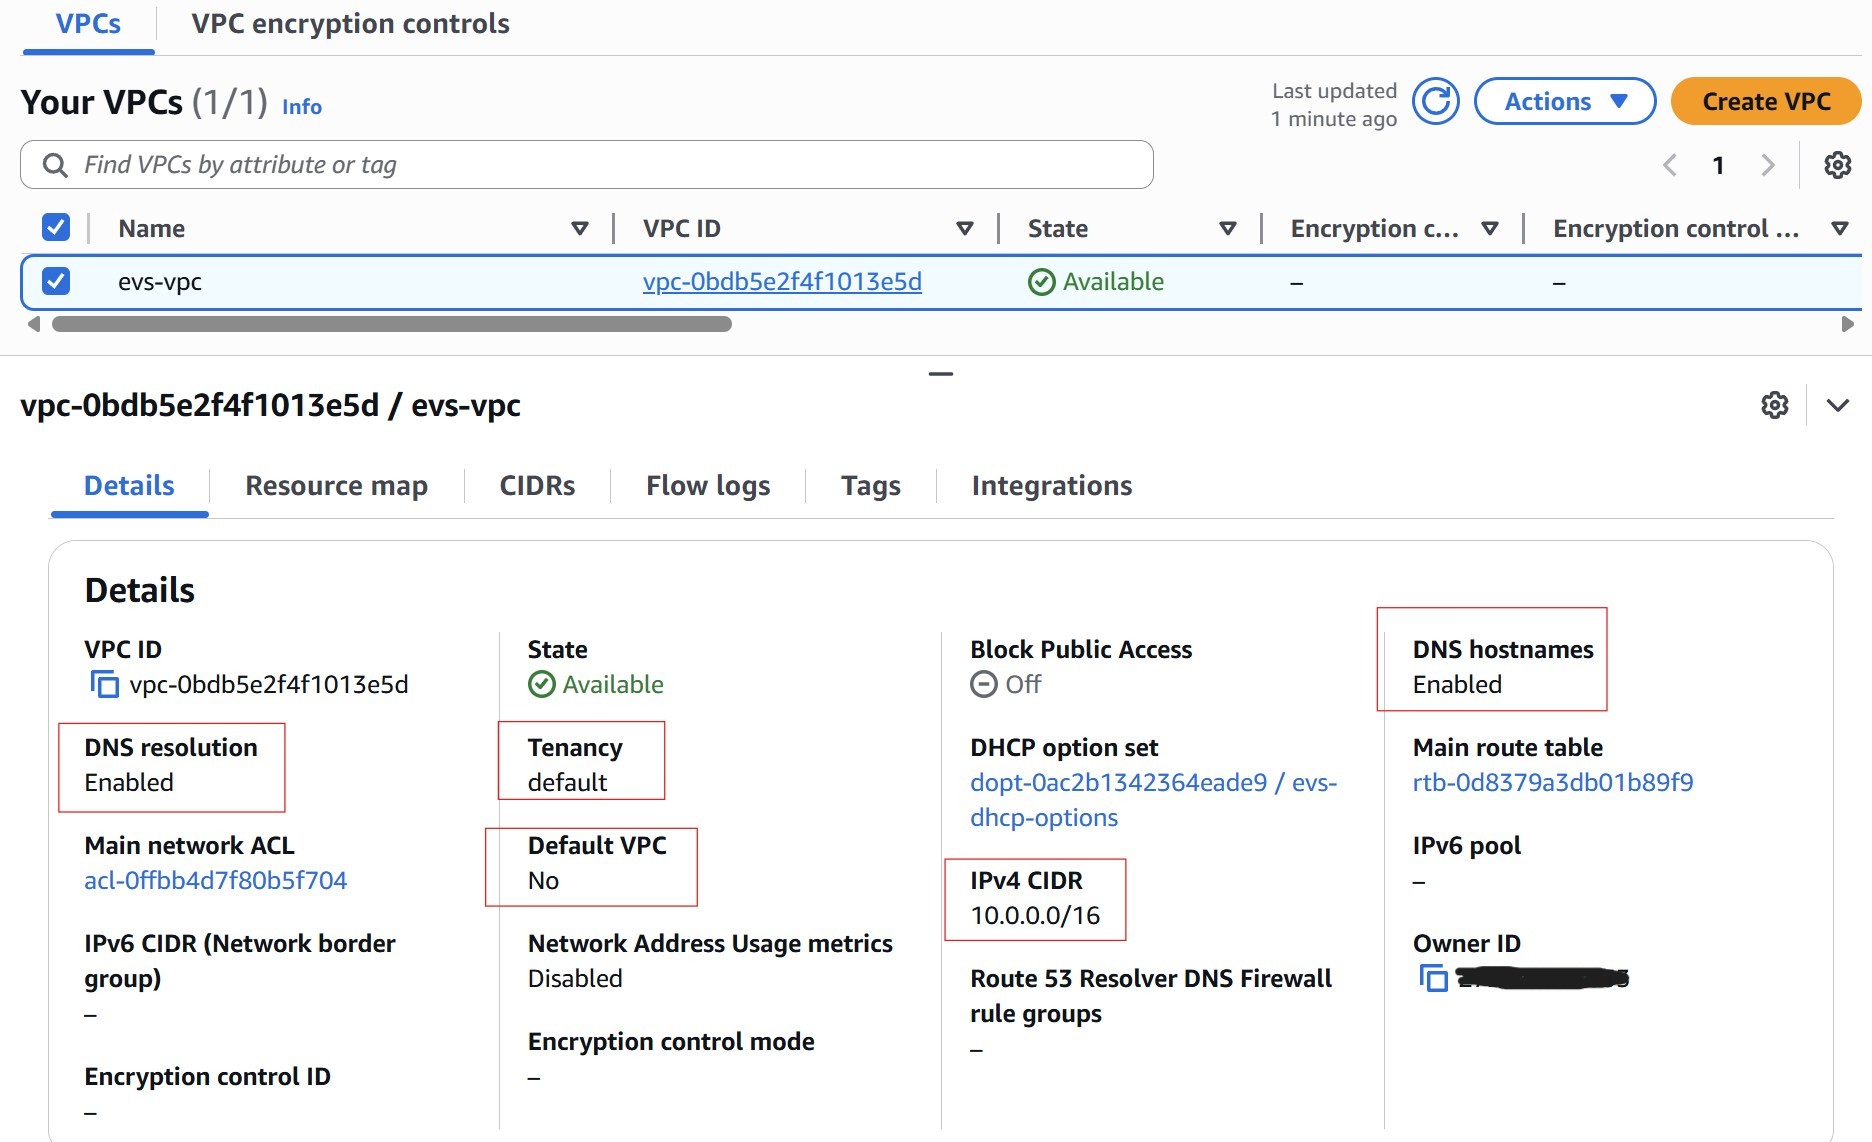
4.2 Enable DNS on the VPC
Both DNS attributes must be enabled or EVS environment creation will fail:
aws ec2 modify-vpc-attribute --vpc-id vpc-xxxxxxxxxxxxxxxxx --enable-dns-hostnames
aws ec2 modify-vpc-attribute --vpc-id vpc-xxxxxxxxxxxxxxxxx --enable-dns-support
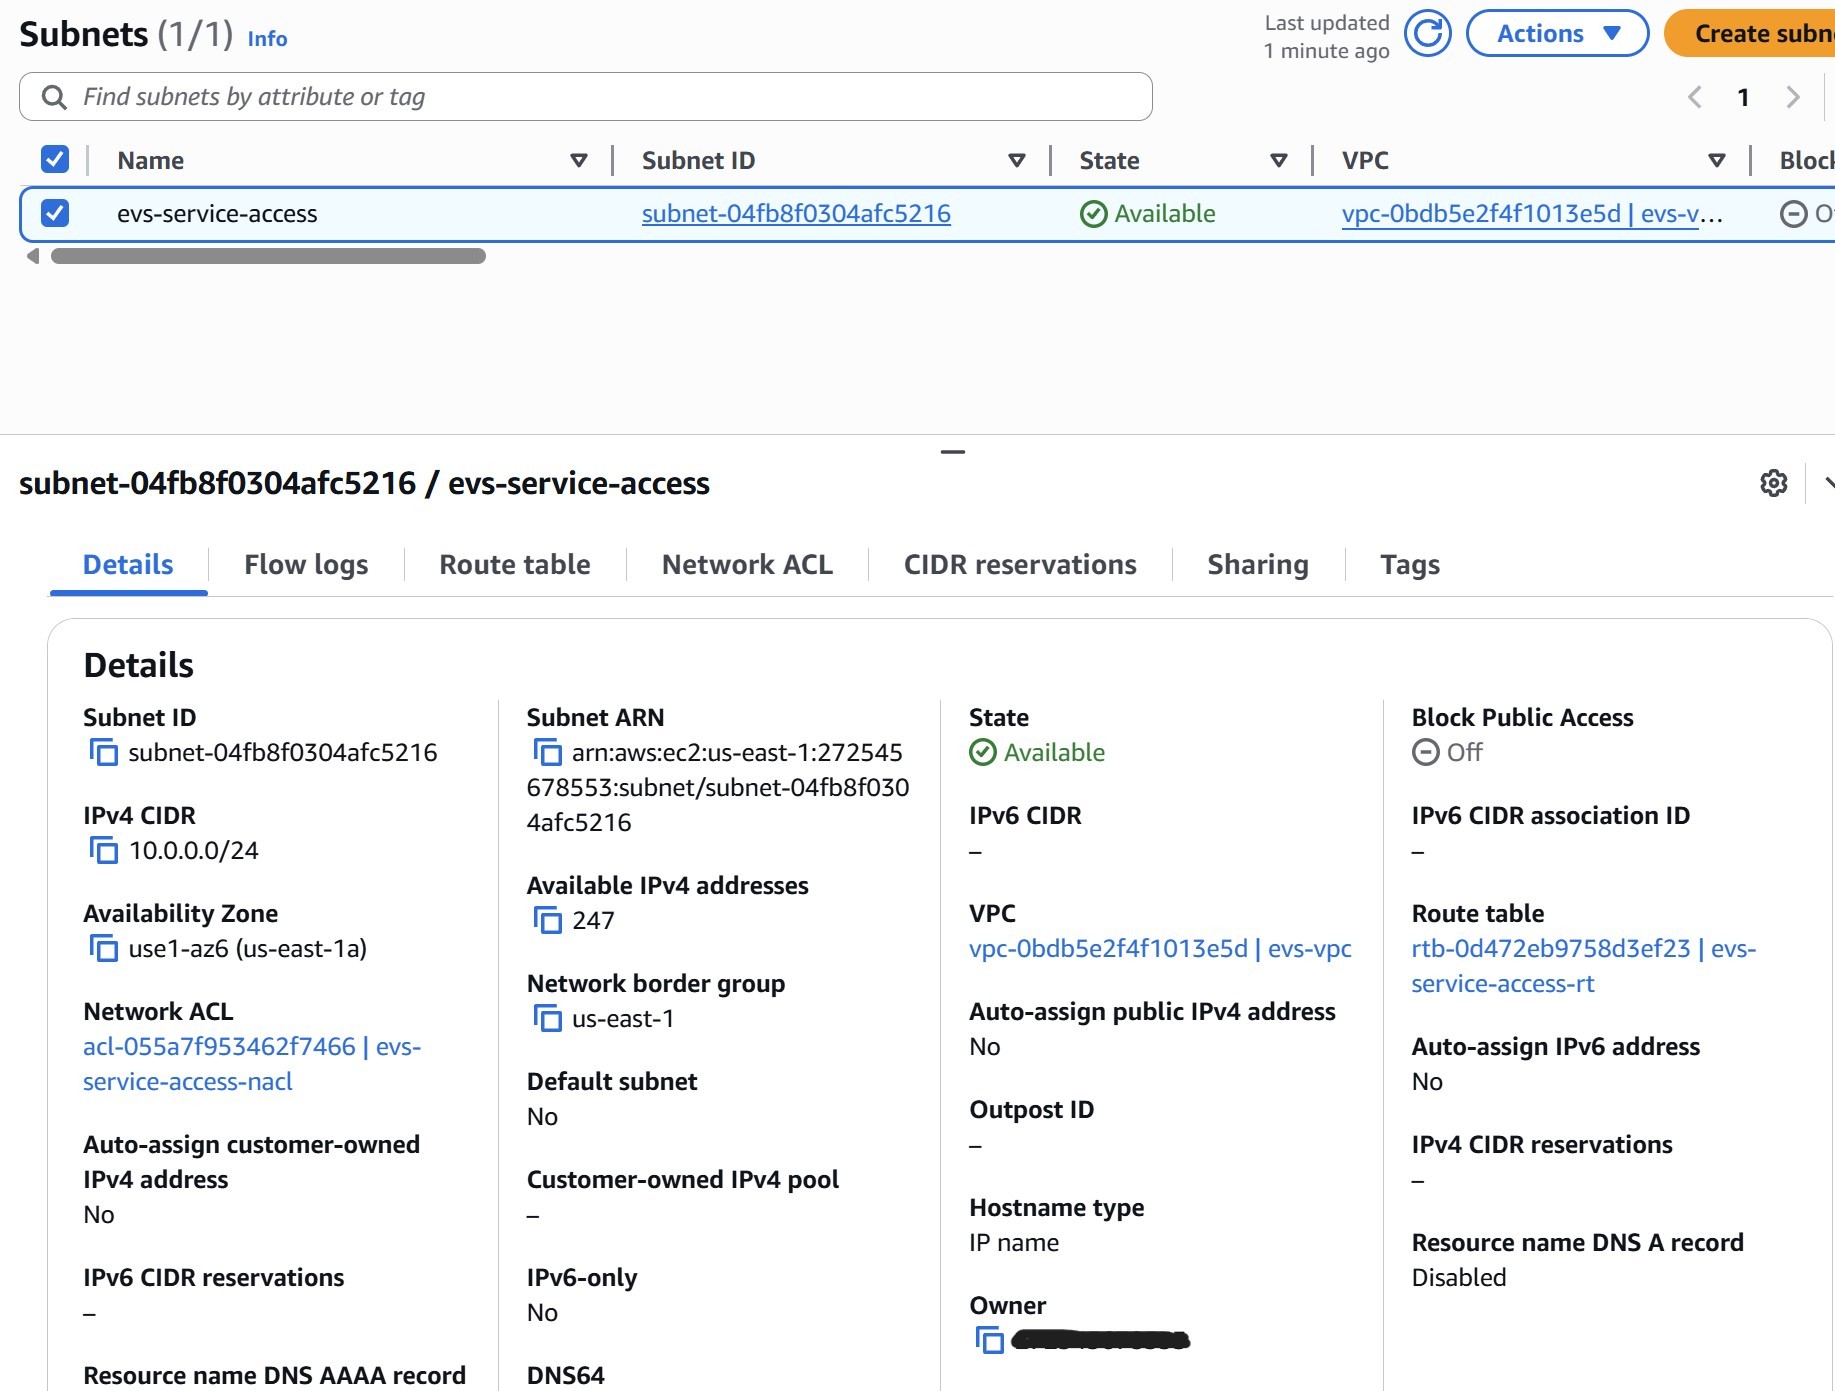
4.3 Create the Service Access Subnet
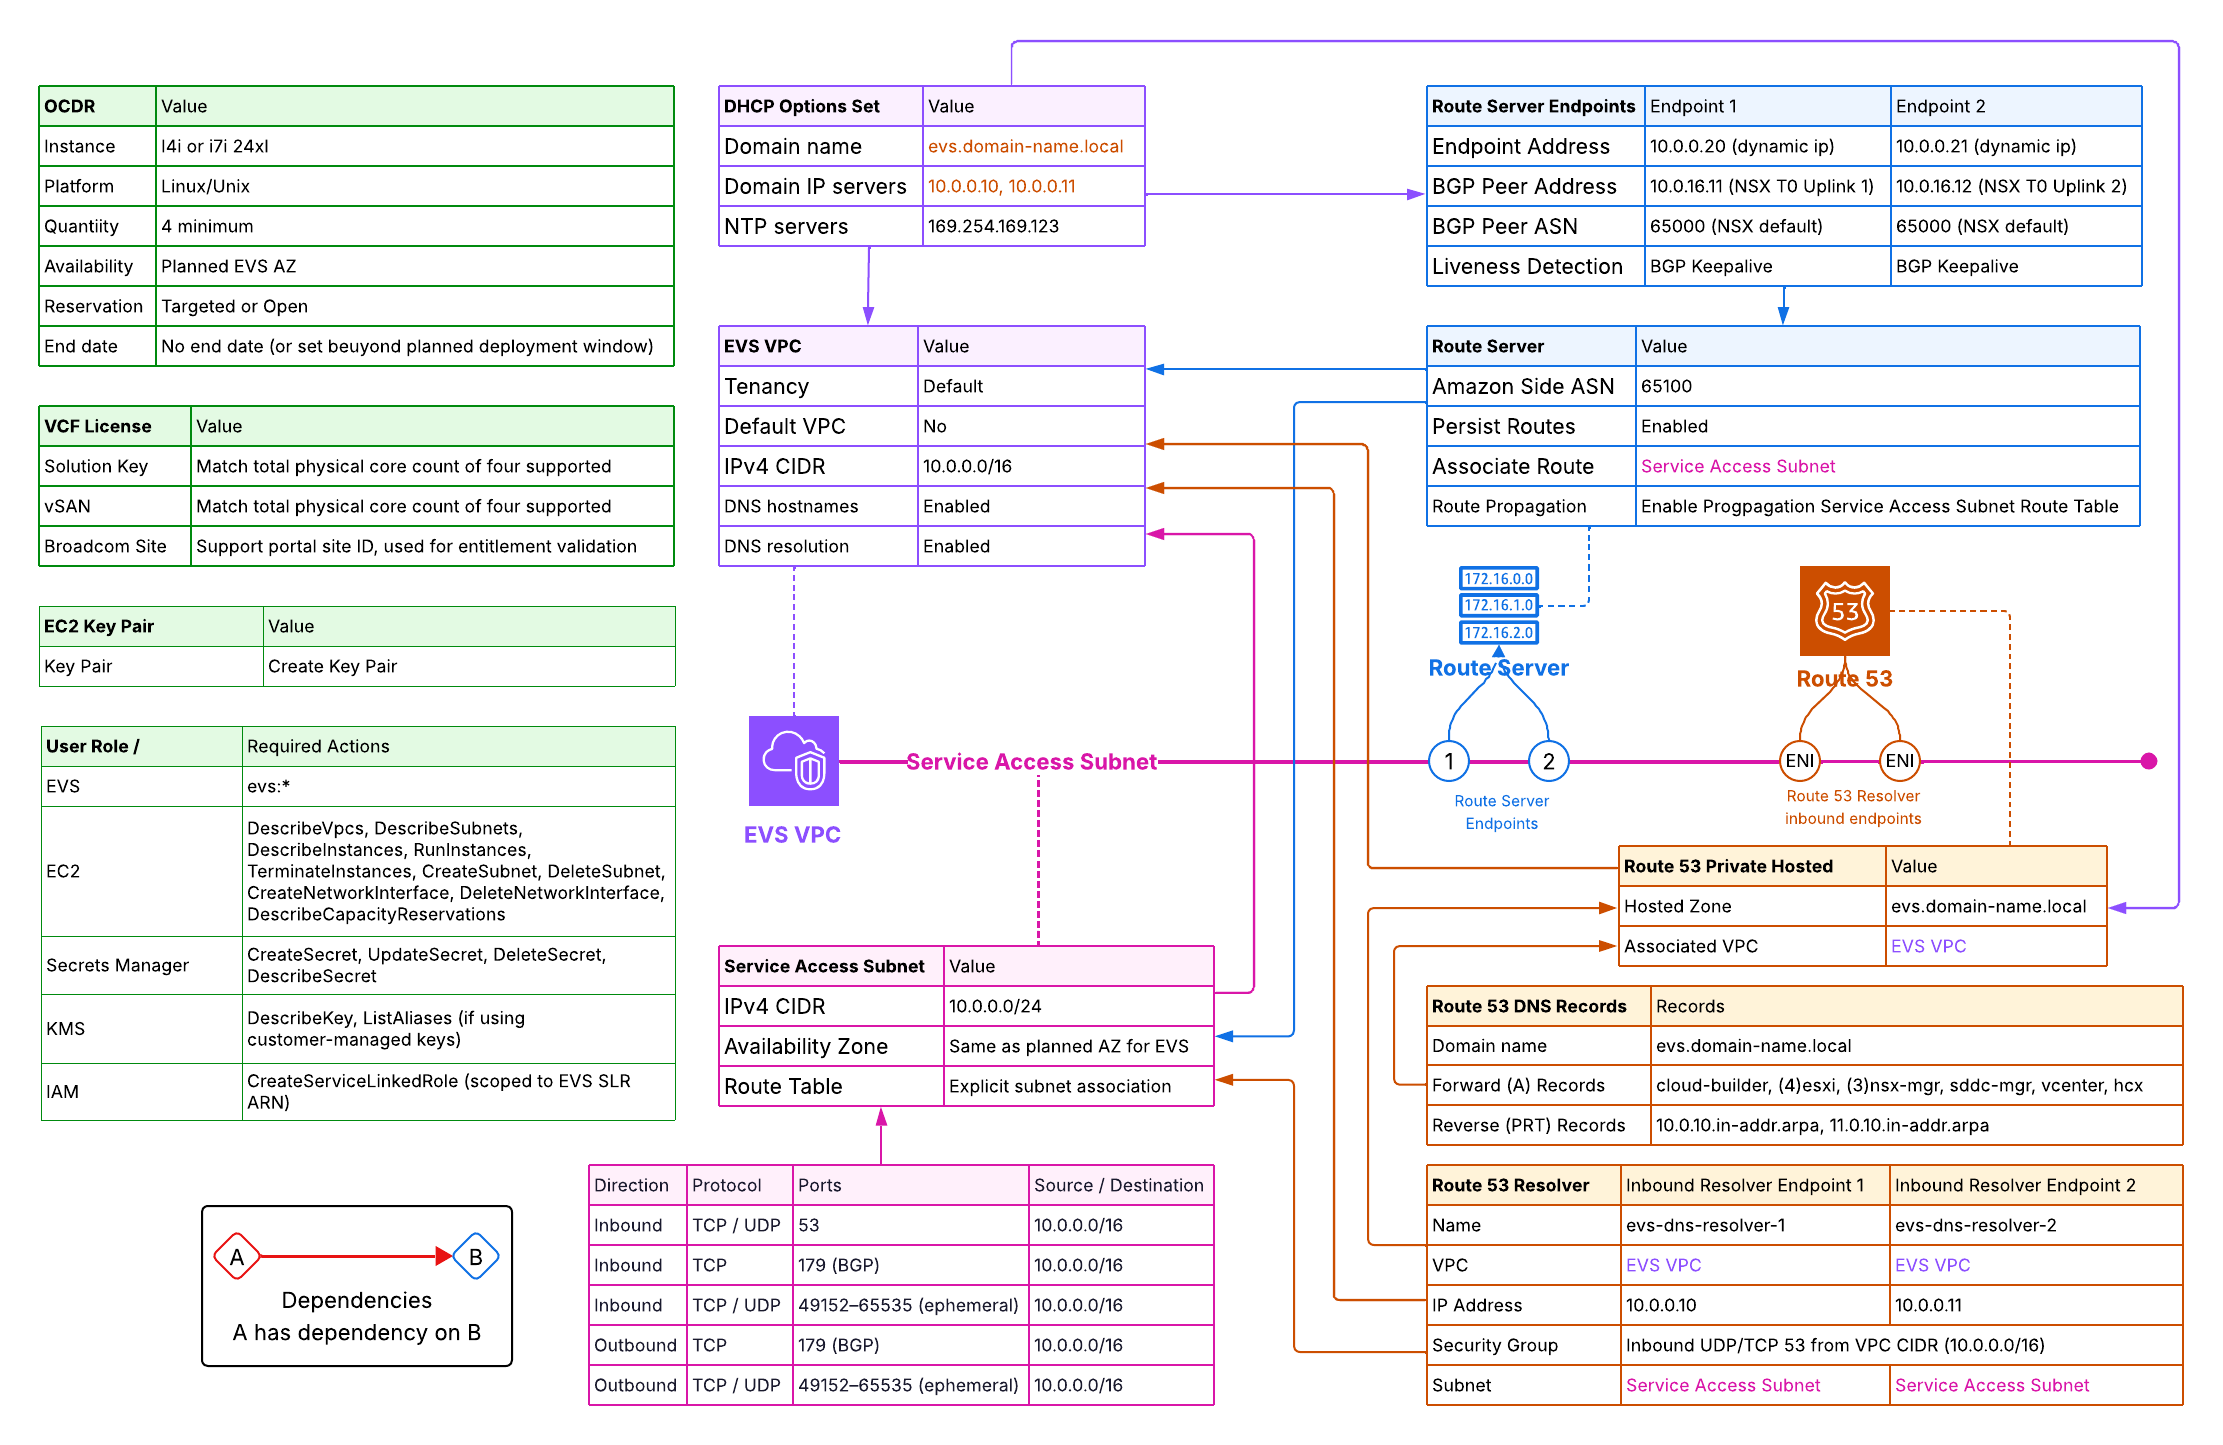
The Service Access Subnet is a dedicated subnet within the EVS VPC that serves as the control plane landing zone for two critical services:
- VPC Route Server endpoints — the BGP termination points that NSX Tier-0 peers with to exchange routing information between the NSX overlay and the AWS VPC underlay
- Route 53 Resolver inbound ENIs — the DNS interfaces that VCF components use to resolve private hostnames in the Route 53 private hosted zone
No EVS workload traffic flows through this subnet. It is strictly a management plane subnet — it carries DNS queries and BGP sessions, not VM data-plane traffic. Create it now, before Step 5, because the Route 53 Resolver endpoints (Step 5.2) must be placed into this subnet when they are created.
AWS recommendations
- Use /24: AWS recommends a /24. Although the minimum required IPs are few (2 resolver ENIs + 2 route server endpoints), a /24 gives headroom for future infrastructure additions
- Single AZ: Place the subnet in the same Availability Zone as the EVS environment — all EVS resources must be in a single AZ
- Explicit route table association: The subnet must have an explicitly associated route table (not relying on the VPC main route table). Without this, BGP routes propagated by the Route Server (Step 7) will silently fail to appear
- No workloads: Do not launch EC2 instances or other workloads in this subnet — keep it dedicated to EVS control plane services
| Setting | Requirement |
|---|---|
| VPC | The EVS VPC |
| CIDR size | /24 recommended (minimum /28 for Route Server endpoints alone) |
| Availability Zone | Same AZ as the planned EVS environment |
| Route Table | Must have an explicit subnet association — not just the implicit main route table. This is required for BGP route propagation in Step 7. |
Network ACL for the Service Access Subnet
The Service Access Subnet hosts both the Route 53 Resolver inbound ENIs (DNS) and the VPC Route Server endpoints (BGP). Configure the NACL now to allow both protocols. NACLs are stateless — both directions must be explicitly permitted.
| Direction | Protocol | Ports | Source / Destination |
|---|---|---|---|
| Inbound | UDP/TCP | 53 | 10.0.0.0/16 (VPC CIDR) |
| Inbound | TCP | 179 | 10.0.0.0/16 (VPC CIDR) |
| Inbound | UDP/TCP | 49152–65535 | 10.0.0.0/16 (VPC CIDR) |
| Outbound | UDP/TCP | 49152–65535 | 10.0.0.0/16 (VPC CIDR) |
| Outbound | TCP | 179 | 10.0.0.0/16 (VPC CIDR) |
protocol = "-1" (allow all traffic from the VPC CIDR) in both directions. This is functionally permissive — the specific rules in the table above represent best-practice least-privilege and should be used in production environments.
5 Step 5: Route 53 Private Zone & Inbound Resolvers
VCF is extremely sensitive to DNS. EVS validates every DNS record during bring-up and will fail with a specific error for each missing or incorrect record. Complete this phase fully before creating the DHCP Options Set or the EVS environment.
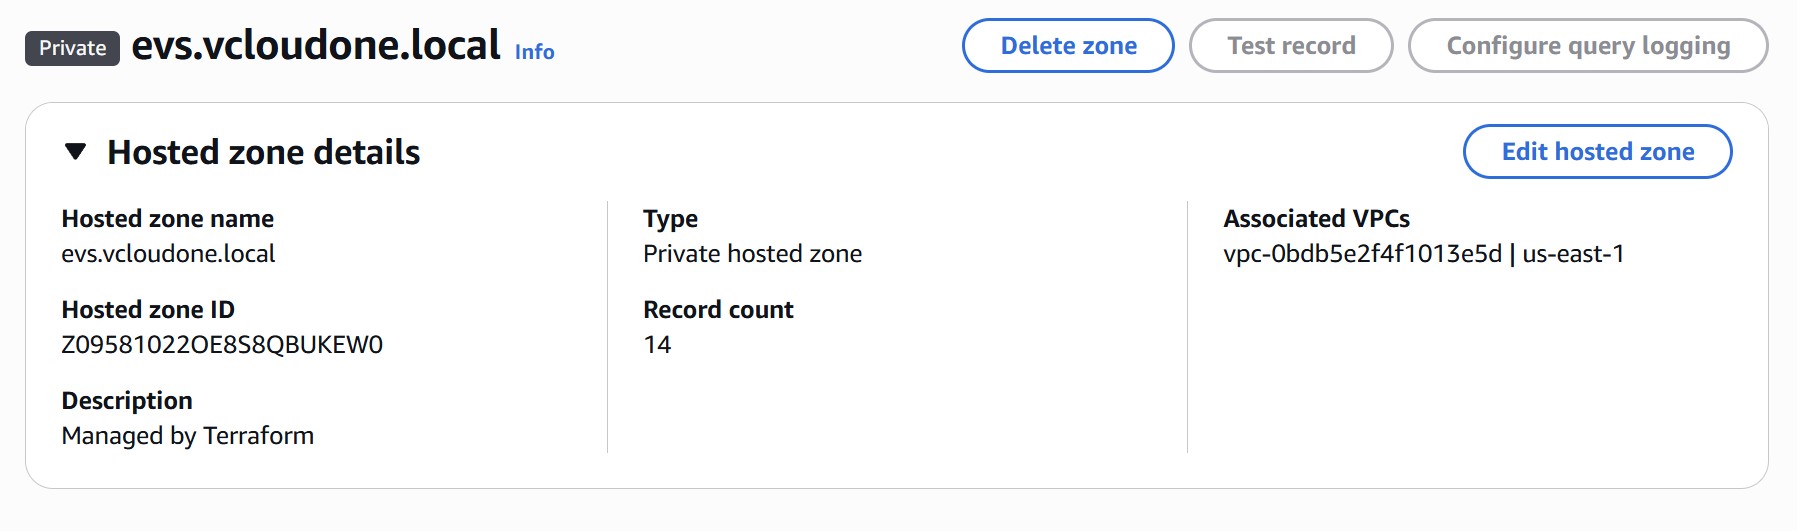
5.1 Create the Route 53 Private Hosted Zone
Create a private hosted zone in Route 53 and associate it with the EVS VPC. Choose a domain that matches the domain_name you will put in the DHCP Options Set (e.g., evs.vcloudone.local). This domain must be unique within the VPC — do not reuse an existing zone.
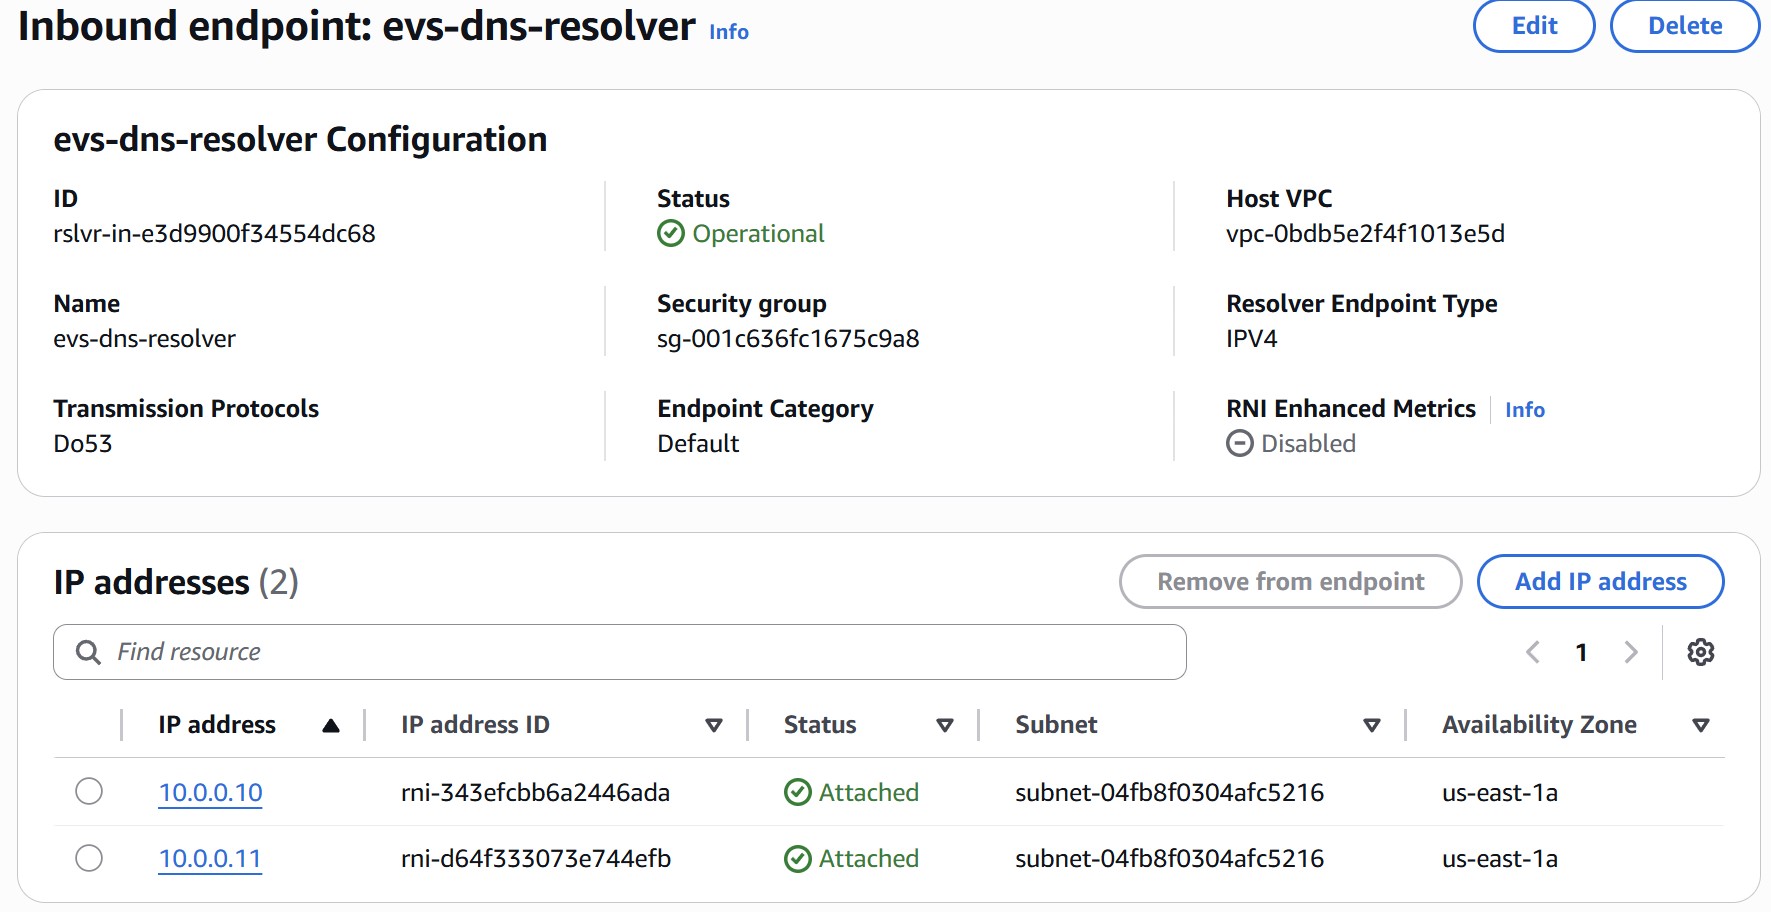
5.2 Create Two Inbound Resolver Endpoints
Route 53 Resolver inbound endpoints allow VCF components running in the EVS VLANs to reach the private hosted zone. You must create two endpoints — each receives its own ENI and a dedicated IP address from the Service Access Subnet. These two IPs become the primary and secondary DNS servers in your DHCP Options Set.
Navigate to Route 53 › Resolver › Inbound endpoints › Create inbound endpoint and configure:
| Field | Resolver 1 | Resolver 2 |
|---|---|---|
| Name | evs-dns-resolver-1 | evs-dns-resolver-2 |
| VPC | EVS VPC | EVS VPC |
| Security Group | Allow UDP/TCP port 53 inbound from VPC CIDR (e.g. 10.0.0.0/16) | |
| IP Address (AZ) | 10.0.0.10 — Service Access Subnet | 10.0.0.11 — Service Access Subnet |
Note both IP addresses. They are used directly as domain-name-servers in the DHCP Options Set in Step 6.
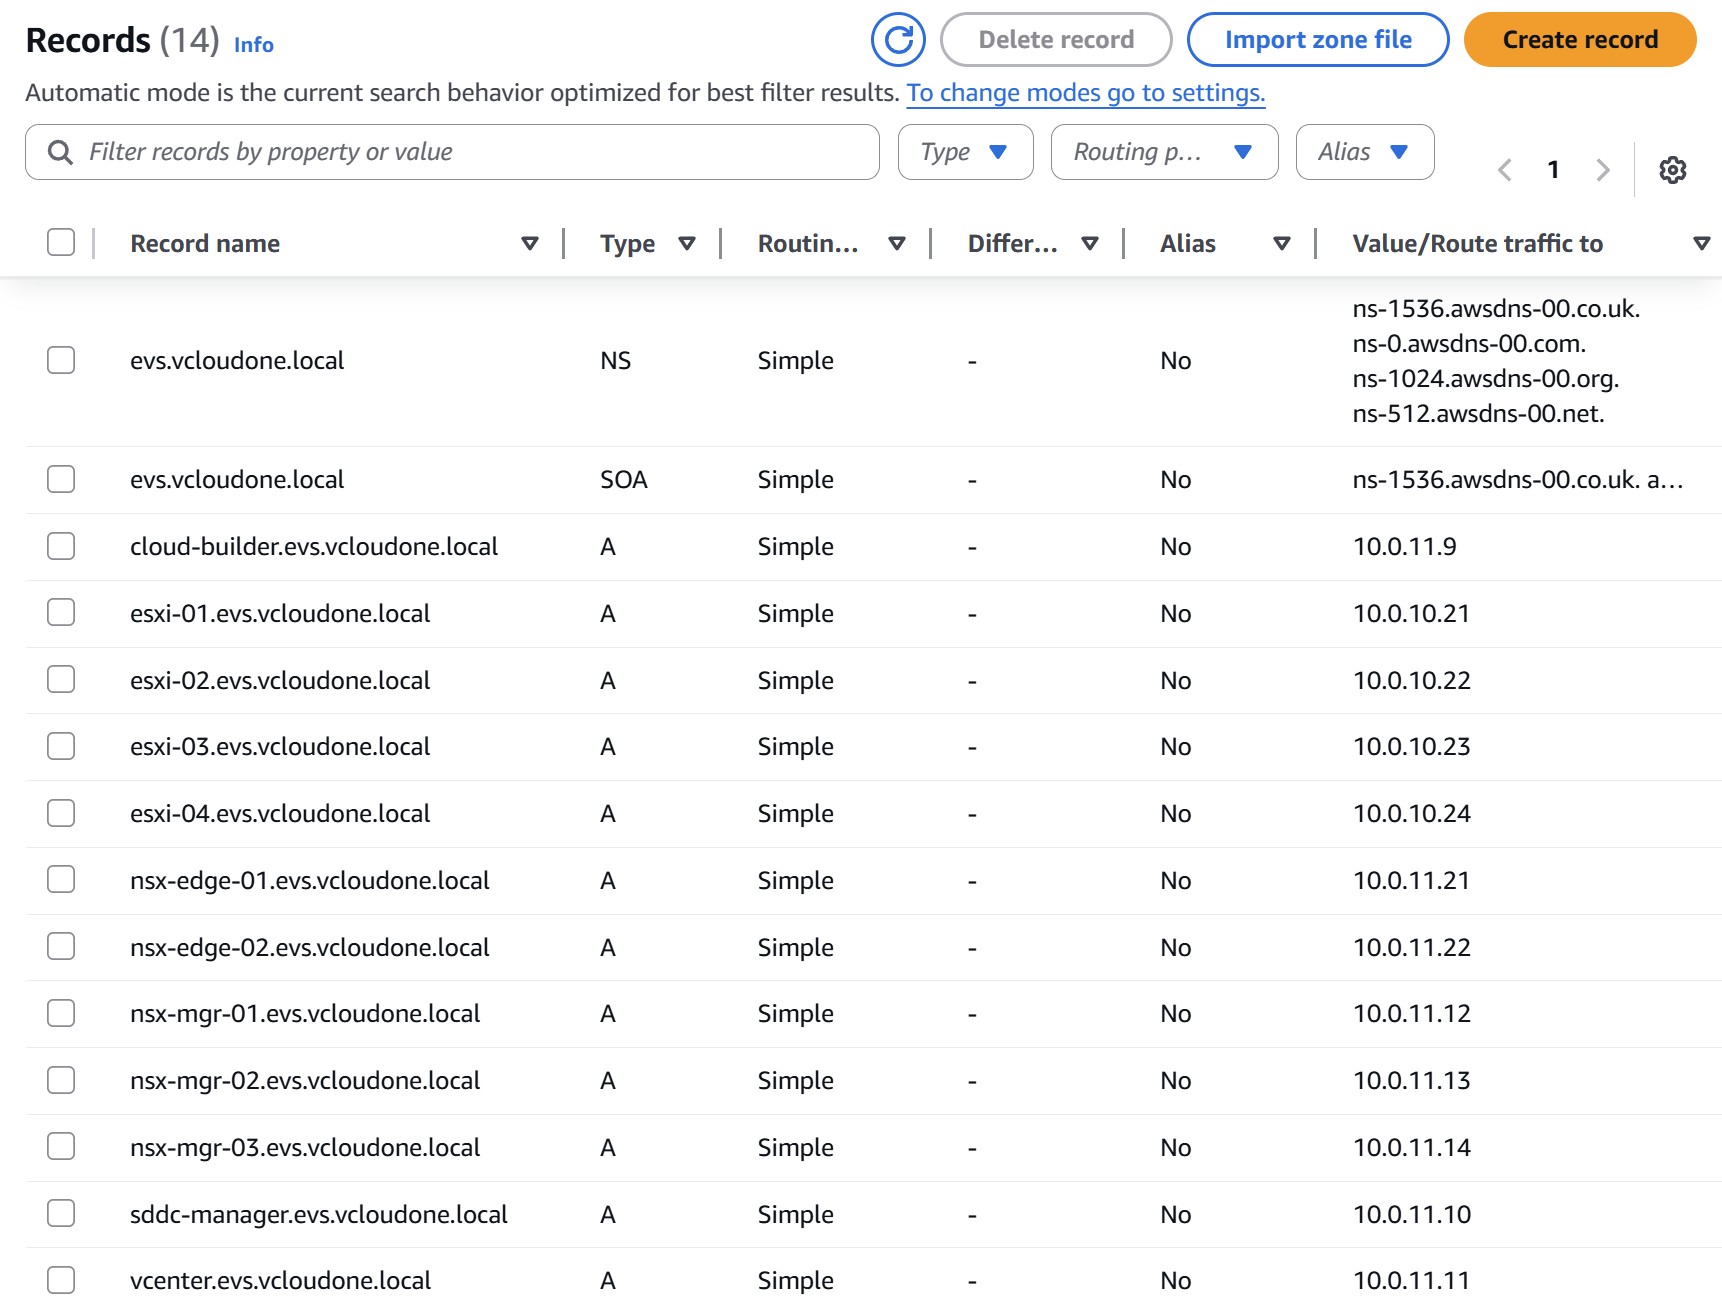
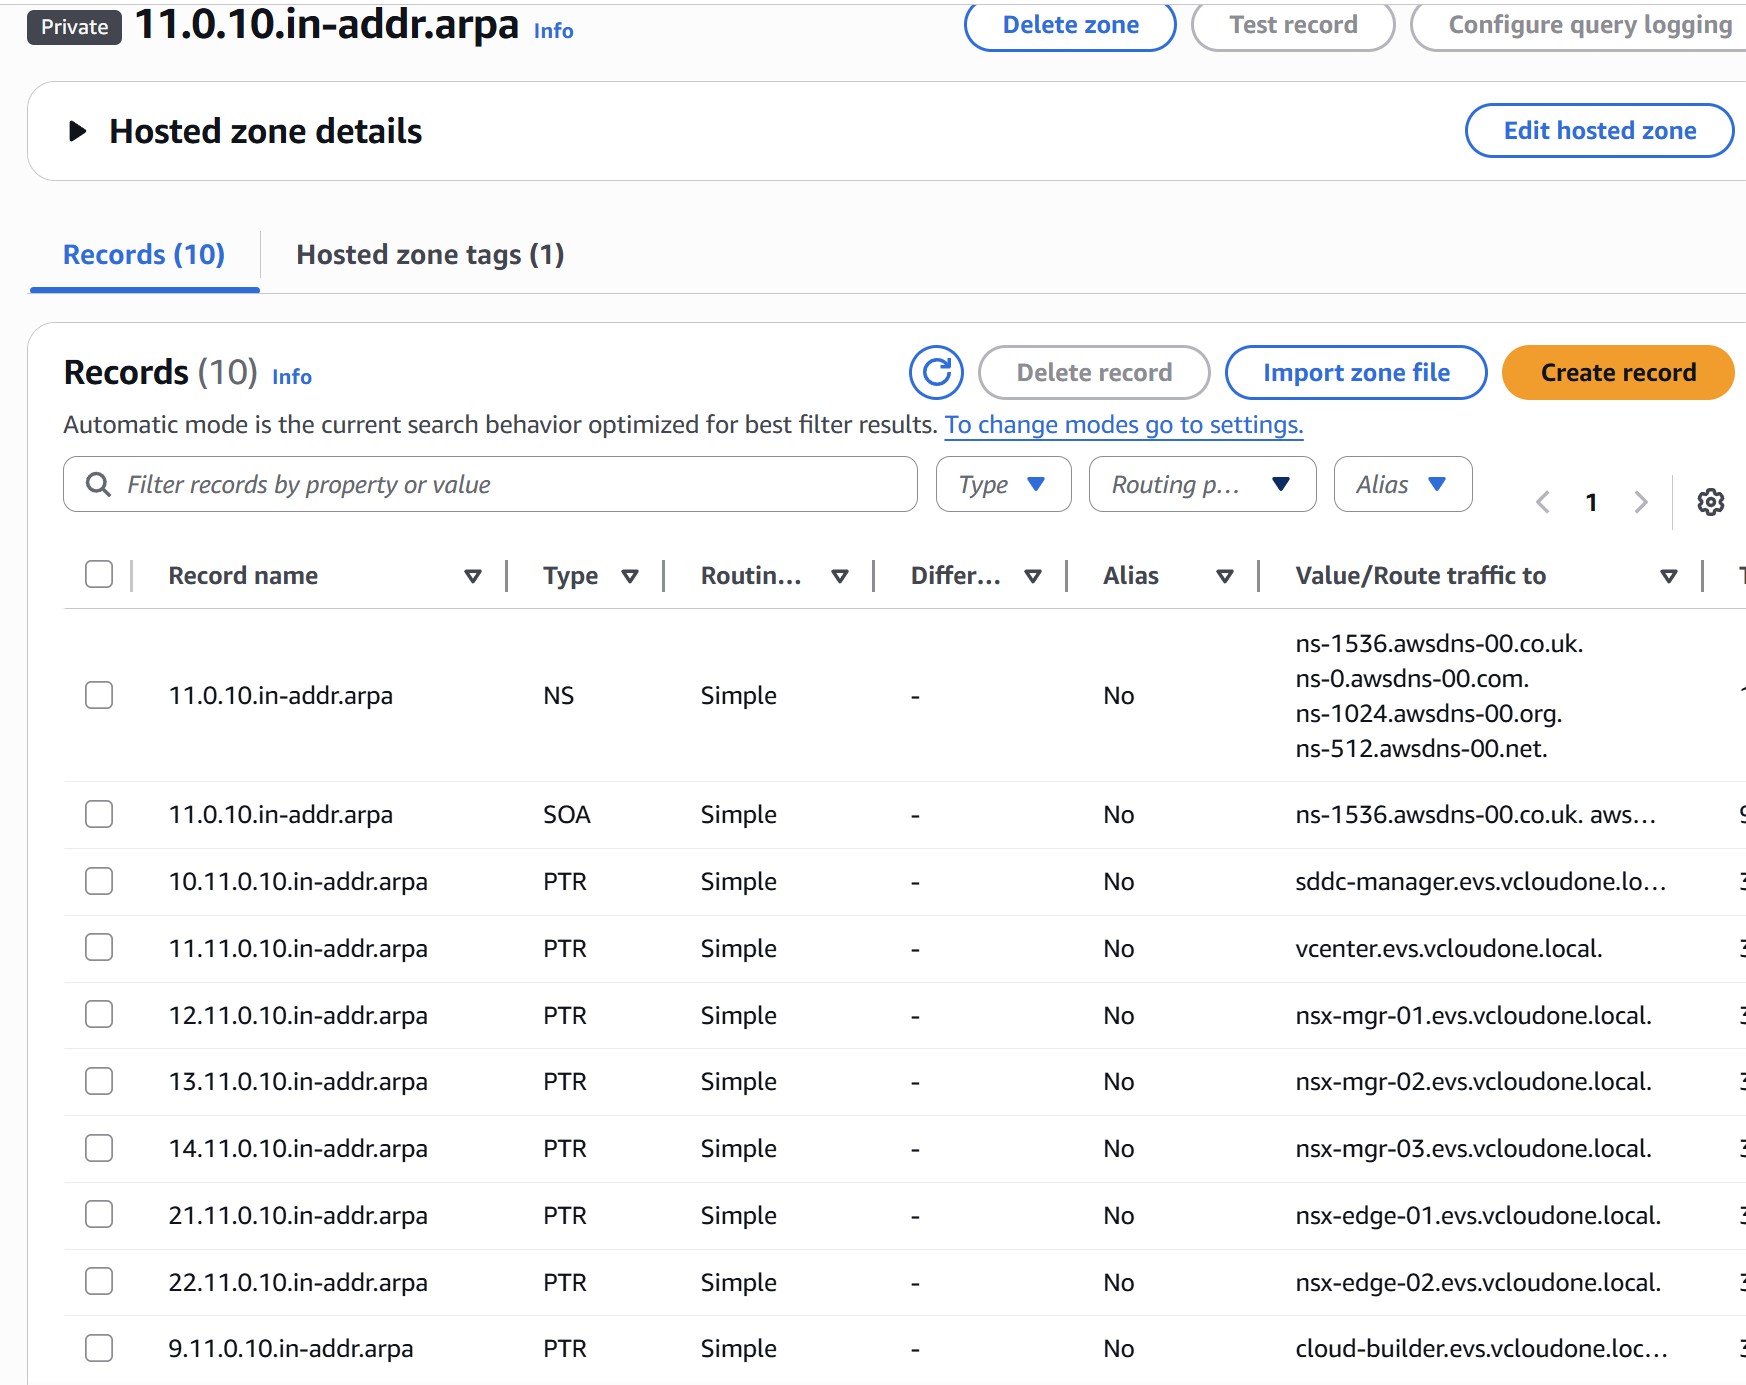
5.3 Create DNS Records — A and PTR for All Components
All forward (A) and reverse (PTR) records must exist before EVS bring-up. Use IPs from your Management VM VLAN (10.0.11.0/24) for appliances and Host Management VLAN (10.0.10.0/24) for ESXi hosts. Create the following records in the private hosted zone:
| Component | Forward A Record | Reverse PTR IP | VLAN |
|---|---|---|---|
| Cloud Builder | cloud-builder.evs.vcloudone.local | 10.0.11.9 | Mgmt VM |
| ESXi Host 01 | esxi-01.evs.vcloudone.local | 10.0.10.21 | Host Mgmt |
| ESXi Host 02 | esxi-02.evs.vcloudone.local | 10.0.10.22 | Host Mgmt |
| ESXi Host 03 | esxi-03.evs.vcloudone.local | 10.0.10.23 | Host Mgmt |
| ESXi Host 04 | esxi-04.evs.vcloudone.local | 10.0.10.24 | Host Mgmt |
| SDDC Manager | sddc-manager.evs.vcloudone.local | 10.0.11.10 | Mgmt VM |
| vCenter Server | vcenter.evs.vcloudone.local | 10.0.11.11 | Mgmt VM |
| NSX Manager 01 | nsx-mgr-01.evs.vcloudone.local | 10.0.11.12 | Mgmt VM |
| NSX Manager 02 | nsx-mgr-02.evs.vcloudone.local | 10.0.11.13 | Mgmt VM |
| NSX Manager 03 | nsx-mgr-03.evs.vcloudone.local | 10.0.11.14 | Mgmt VM |
| NSX Manager Cluster (VIP) | nsx-mgr.evs.vcloudone.local | 10.0.11.15 | Mgmt VM |
| NSX Edge 01 | nsx-edge-01.evs.vcloudone.local | 10.0.11.21 | Mgmt VM |
| NSX Edge 02 | nsx-edge-02.evs.vcloudone.local | 10.0.11.22 | Mgmt VM |
| HCX Manager | (Optional) hcx.evs.vcloudone.local | 10.0.20.10 | HCX Uplink |
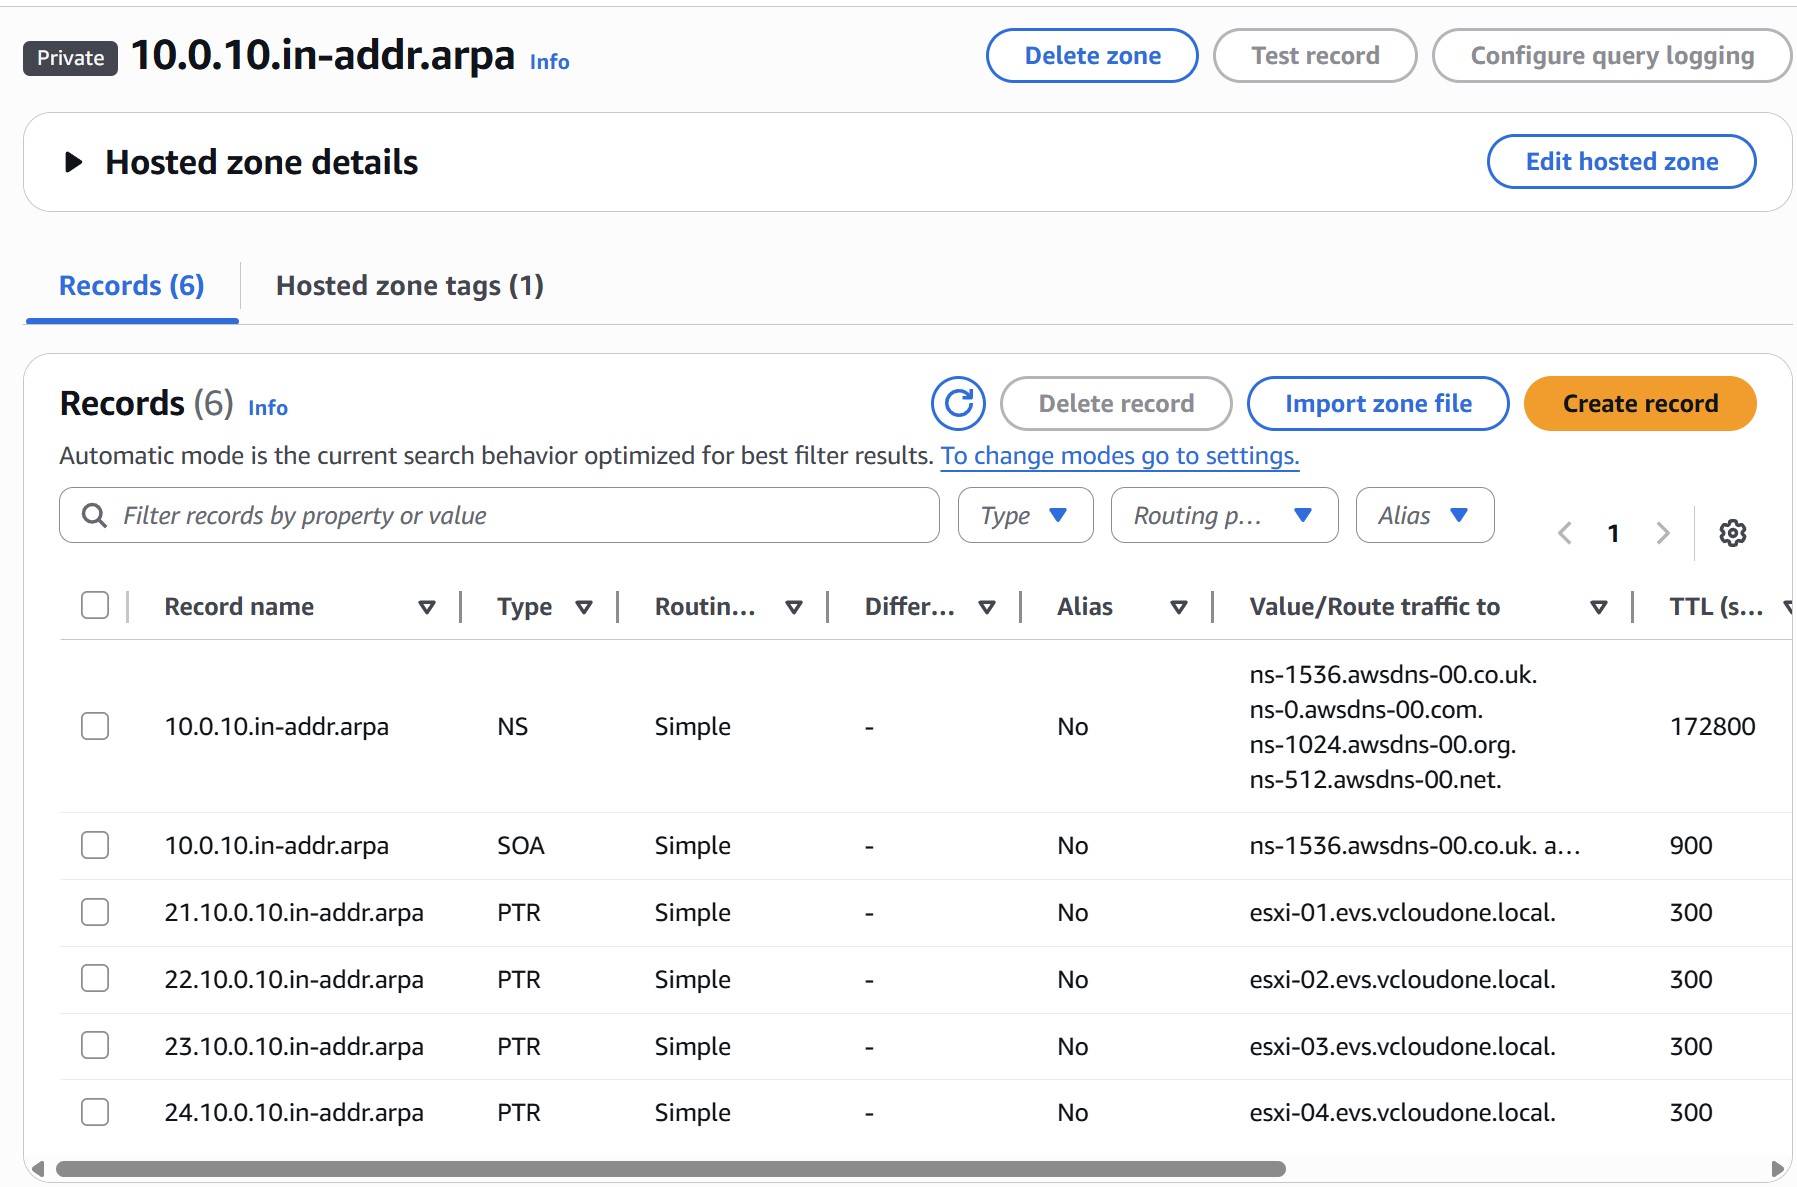
Also create reverse lookup (PTR) zones for each subnet: 10.0.10.in-addr.arpa (Host Mgmt) and 11.0.10.in-addr.arpa (Mgmt VM), associated with the EVS VPC.
5.4 Alternative: Use Your Own DNS Server (Optional)
If your organization already runs its own DNS infrastructure — Microsoft DNS, Infoblox, BIND, or any other provider — you can skip Steps 5.1 and 5.2 and use it instead of Route 53. Your DNS server must be reachable from the EVS VPC on UDP/TCP port 53, either running as a VM inside the VPC or accessible via Transit Gateway from on-premises.
| Requirement | Details |
|---|---|
| Reachability | DNS server IPs must be reachable from the EVS VPC on UDP/TCP port 53 |
| Two server IPs | EVS requires both a primary and secondary DNS IP in the DHCP Options Set — ensure two IPs are available (two servers, or one server with two IPs) |
| Records | All A and PTR records from Step 5.3 must still be created on your DNS server — the record requirements do not change |
| Forward & reverse zones | Both forward and reverse (PTR) zones must exist, just as they would in Route 53 |
| Domain name | Must exactly match what you enter in the DHCP Options Set domain name field |
6 Step 6: DHCP Options Set
The DHCP Options Set tells EVS-managed hosts how to resolve DNS and synchronize time. It must be associated with the VPC before environment creation — not after.
6.1 Create and Associate the DHCP Options Set
Navigate to VPC › DHCP Option Sets › Create DHCP options set and configure:
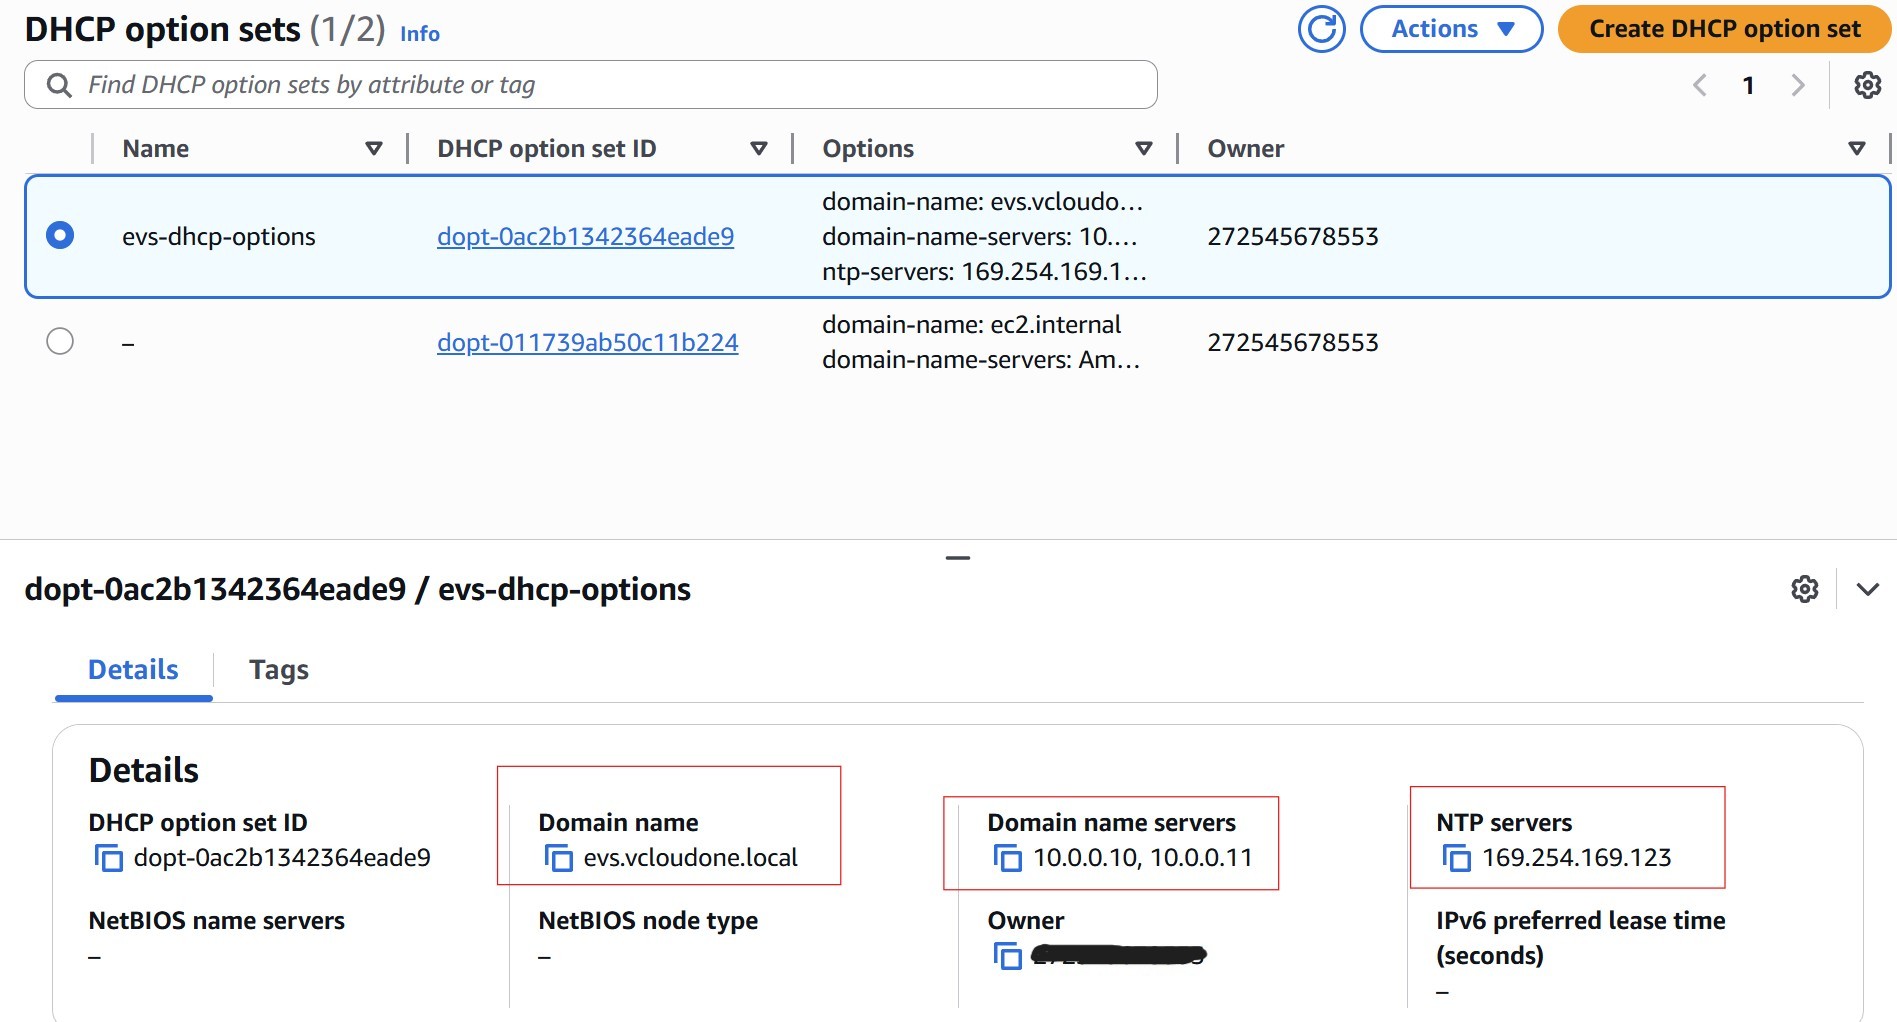
| Field | Value | Notes |
|---|---|---|
| Domain name | evs.vcloudone.local | Must exactly match the Route 53 private hosted zone name |
| Domain name servers | 10.0.0.10, 10.0.0.11 | The two inbound resolver IPs from Step 5.2 — primary first |
| NTP servers | 169.254.169.123 | AWS Time Sync Service — link-local, no internet required |
After creating the set, associate it with the EVS VPC: select the VPC › Actions › Edit DHCP options set › choose the new set.
6.2 Alternative: Use Your Own NTP Server (Optional)
If your organization runs its own NTP infrastructure, replace 169.254.169.123 with your NTP server IP in the DHCP Options Set. Your NTP server must be reachable from the EVS VPC. Time accuracy is critical for VCF — certificate validation, vSAN, and NSX all depend on synchronized time across all hosts and management VMs.
When using your own DNS and NTP, configure the DHCP Options Set as follows:
| Field | Value | Notes |
|---|---|---|
| Domain name | Your DNS zone name | Must exactly match the zone on your DNS server |
| Domain name servers | Your DNS server IPs (primary, secondary) | Both must be reachable from the VPC on port 53 |
| NTP servers | Your NTP server IP | Must be reachable from the VPC |
7 Step 7: VPC Route Server & BGP
The VPC Route Server is the BGP bridge between the AWS underlay and the NSX overlay. You configure the AWS side entirely before bring-up. NSX Tier-0 BGP is automatically configured by EVS during environment creation — you do not need to touch NSX for this.
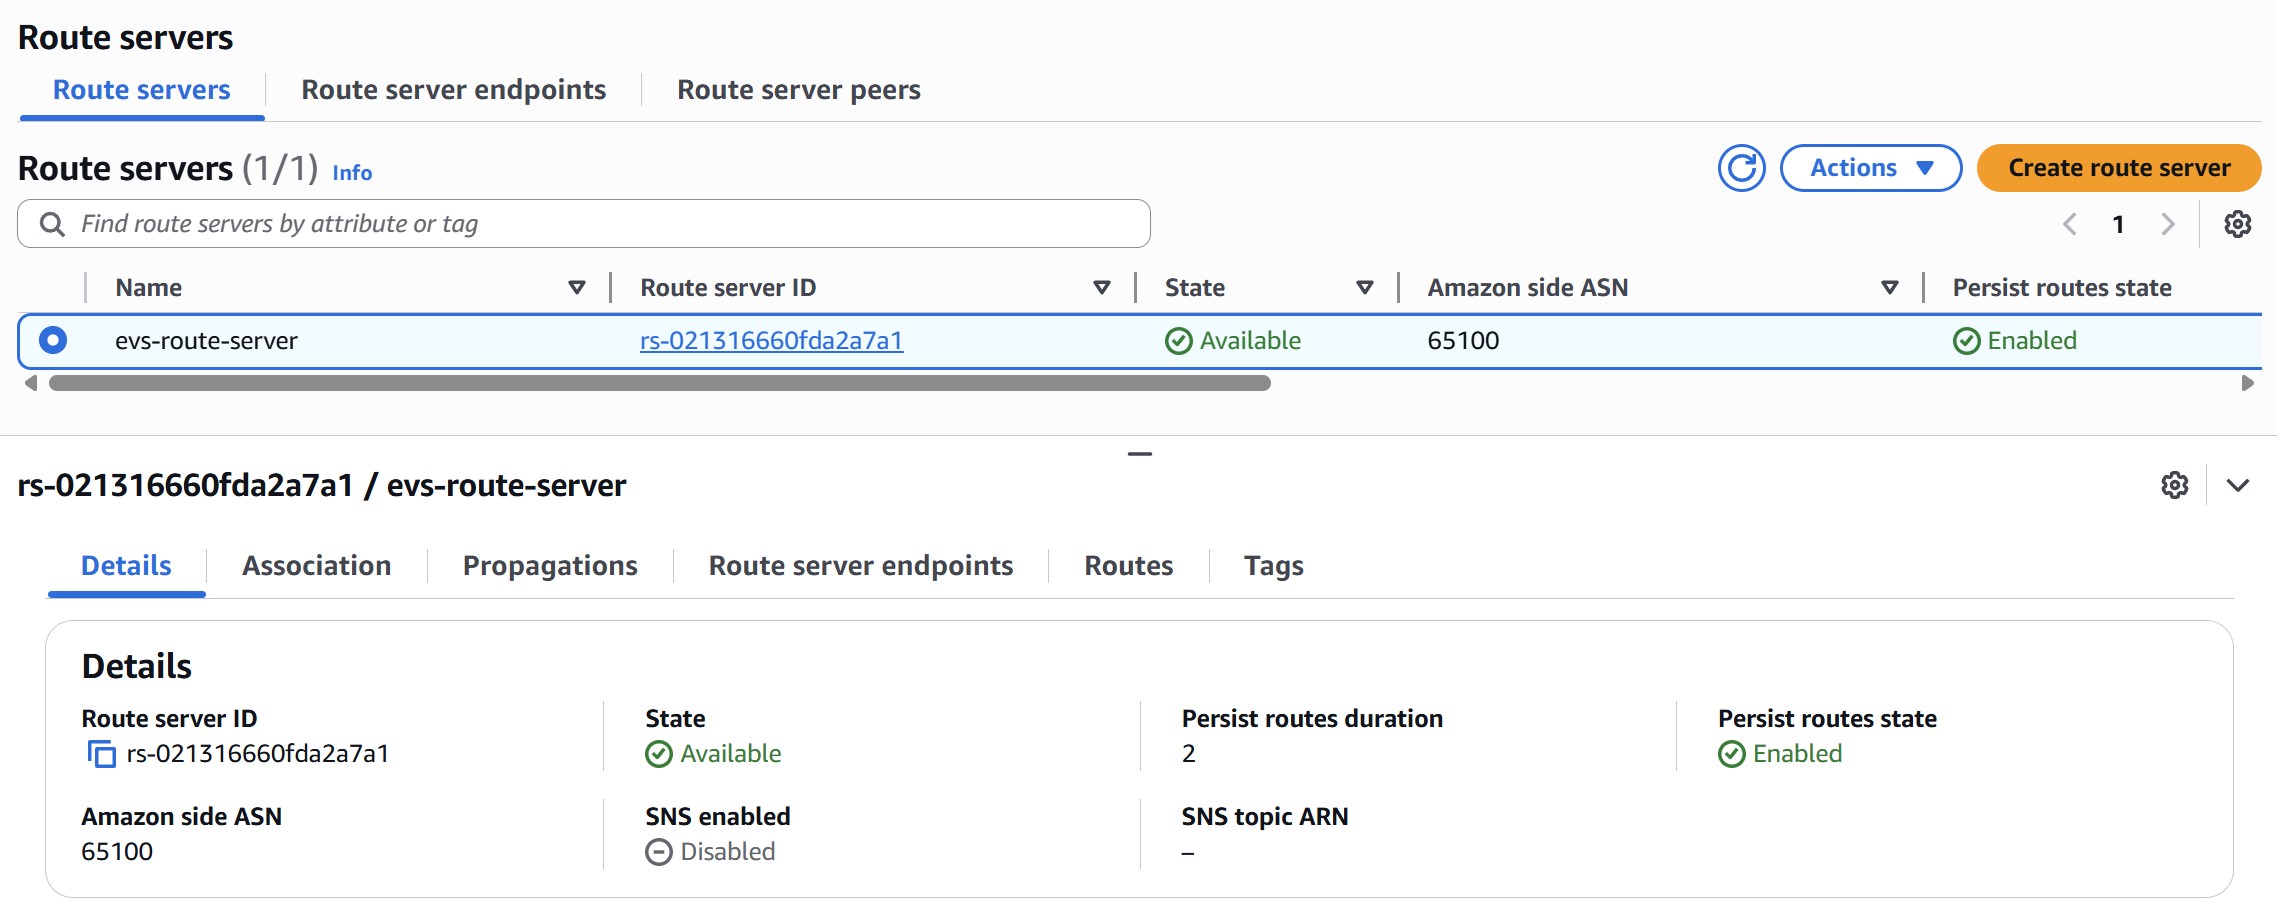
7.1 Create the VPC Route Server
Navigate to VPC › Route Servers › Create route server:
| Field | Value | Notes |
|---|---|---|
| Amazon Side ASN | e.g. 65100 | Must be a private ASN — 16-bit range 64512–65534 or 32-bit range 4200000000–4294967294. Must differ from NSX Tier-0 ASN (default 65000). |
| Persist Routes | Enabled | Preserves routes for 1–5 min after BGP session drops; prevents route flaps during maintenance |
| SNS Notifications | Recommended | Alerts on BGP state changes in production |
Wait for Route Server status to reach Available before proceeding.
7.2 Associate with the Service Access Subnet
Select the Route Server › Associations › Associate route server. Select the Service Access Subnet created in Step 4.3. AWS will automatically deploy two Route Server endpoints into that subnet. Note the IP address of each endpoint — EVS uses these as the BGP neighbor addresses when it auto-configures the NSX Tier-0 gateway during bring-up.
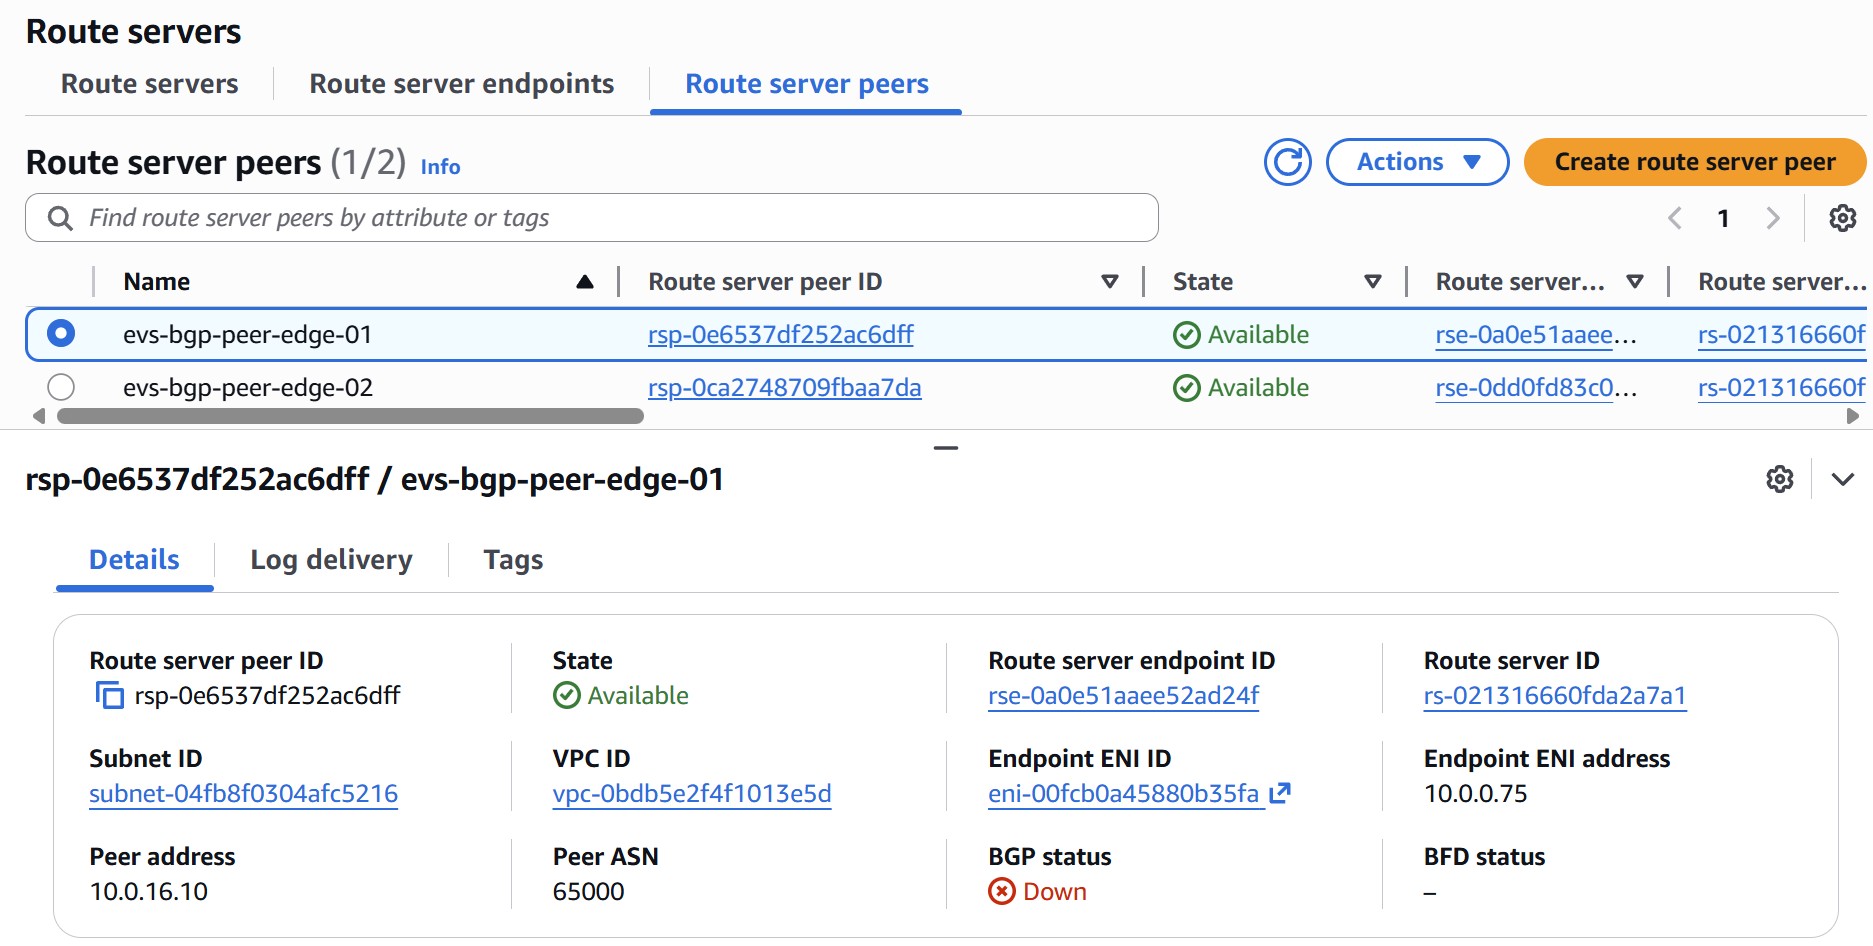
7.3 Create Two Route Server Peers
Navigate to Route server peers › Create route server peer. Create one peer per NSX Edge node. The peer address must be an IP from the NSX Uplink VLAN CIDR (e.g., 10.0.16.0/24) — these IPs will be assigned to NSX Edge uplink interfaces during EVS bring-up.
| Field | Peer 1 (Edge 01) | Peer 2 (Edge 02) |
|---|---|---|
| Route Server Endpoint | Endpoint 1 ID | Endpoint 2 ID |
| Peer Address | 10.0.16.10 (NSX Uplink VLAN) | 10.0.16.11 (NSX Uplink VLAN) |
| Peer ASN | 65000 (NSX default) | 65000 (NSX default) |
| Liveness Detection | BGP Keepalive | BGP Keepalive |
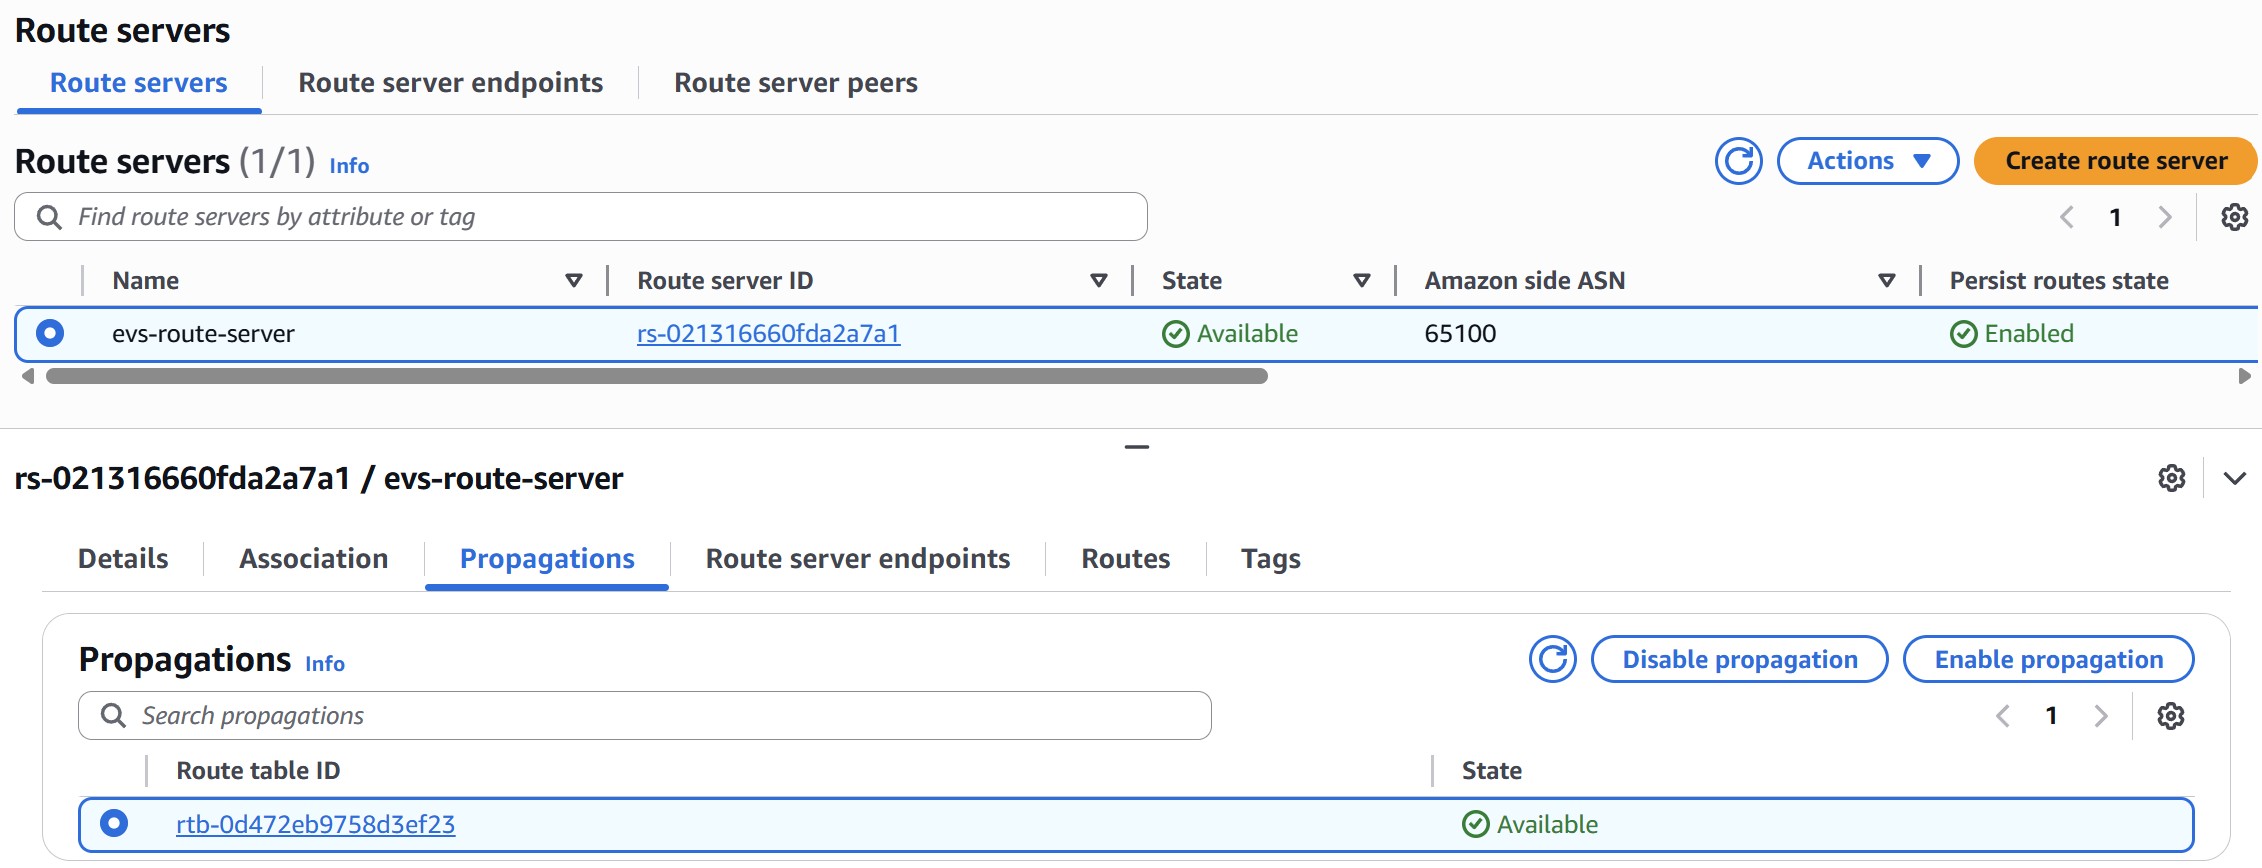
7.4 Enable Route Propagation
Select the Route Server › Propagations › Create propagation. Select the Service Access Subnet route table and any workload subnet route tables that need to receive NSX overlay routes.
8 Step 8: On-Demand Capacity Reservation (ODCR)
Amazon EVS runs on bare-metal instances. Because bare-metal capacity can be constrained in specific AZs, AWS recommends creating an On-Demand Capacity Reservation (ODCR) before deployment to improve your chances of securing capacity. i4i.metal is the confirmed EVS instance type. Check the official EVS versions page for current instance type availability before creating your ODCR.
8.1 Supported Instance Types
| Instance Type | vCPUs | Physical Cores | NVMe Storage | Availability |
|---|---|---|---|---|
| i4i.metal | 128 | 64 | Up to 30 TB | Available now |
| i7i.metal-24xl | 96 | 48 | Up to 15 TB | Verify with official EVS docs |
8.2 Create the Capacity Reservation
| Setting | Value |
|---|---|
| Instance type | Select the instance type for your EVS environment (see table above) |
| Platform | Linux/UNIX |
| Quantity | Minimum 4 (match your planned cluster size; max 16) |
| Availability Zone | Must be the same AZ as the EVS environment |
| Reservation type | Targeted (recommended for security; open also works) |
| End date | No end date (or set beyond your planned deployment window) |
aws ec2 create-capacity-reservation \
  --availability-zone us-east-1a \
  --instance-type i4i.metal \
  --instance-platform Linux/UNIX \
  --instance-count 4 \
  --tag-specifications 'ResourceType=capacity-reservation,Tags=[{Key=Name,Value=evs-odcr-mgmt}]'

# Verify it reaches 'active' state before proceeding
aws ec2 describe-capacity-reservations \
  --query 'CapacityReservations[*].[CapacityReservationId,State,AvailableInstanceCount]'
Service Quotas › Amazon EC2 › Running On-Demand Standard (A, C, D, H, I, M, R, T, Z) instances before deployment if needed.
9 Step 9: VCF Licensing
Amazon EVS is a BYOL (Bring Your Own License) service. Procure all three items from Broadcom before bring-up — you will enter them into the CreateEnvironment wizard during deployment.
9.1 Required License Keys
| License | Minimum | Notes |
|---|---|---|
| VCF Solution Key | Varies by instance type | Core count is based on physical cores × 4 hosts: 256 cores for i4i.metal (64 cores/host) | 192 cores for i7i.metal-24xl (48 cores/host) | 384 cores for i7i.metal-48xl (96 cores/host). Covers vSphere 8 Enterprise Plus, NSX, SDDC Manager, vCenter. Each key can only be assigned to one EVS environment. |
| vSAN License Key | 110 TiB | Covers the vSAN storage capacity of the initial 4-host cluster. Cannot be reused across environments. |
| Broadcom Site ID | Required | Your organization's Broadcom support portal site ID, used for license validation and entitlement verification. |
CreateEnvironment to fail.
10 Step 10: EC2 Key Pair
10.1 EC2 Key Pair
Create an EC2 key pair in the same region as the EVS environment. This key pair is used for SSH access to ESXi hosts during and after deployment. Navigate to EC2 › Key Pairs › Create key pair.
| Setting | Requirement |
|---|---|
| Region | Must be in the same region as the EVS environment |
| Key pair type | RSA (recommended for ESXi compatibility) |
| Private key format | .pem for Linux/macOS, .ppk for PuTTY on Windows |
root to access ESXi hosts after deployment.
✓ Pre-Deployment Checklist
Complete all 10 steps before submitting CreateEnvironment. Use this checklist as your final gate — EVS validates most of these during bring-up and will fail with a specific error for anything missing.
| Check | Step | Verified? |
|---|---|---|
| AWS Business Support (or higher) active | 1 | |
| Transit Gateway configured (if on-premises connectivity required) | 1.3 | |
| IAM user/role has EVS + EC2 + SLR permissions | 2 | |
| VPC CIDR chosen (/16 recommended), RFC 1918, no on-premises overlap | 3.1 | |
| All VLAN CIDRs planned, non-overlapping, within VPC CIDR | 3.2 | |
| VPC created with /22+ CIDR, DNS enabled | 4.1 | |
| Service Access Subnet created with explicit route table association | 4.3 | |
| Service Access Subnet NACL allows UDP/TCP 53 (DNS) and TCP 179 (BGP) | 4.3 | |
| Route 53 private hosted zone created and VPC-associated | 5.1 | |
| Two inbound resolver endpoints created (IPs noted) | 5.2 | |
| All A and PTR records created and resolving correctly | 5.3 | |
| DHCP Options Set created with domain, 2 DNS IPs, NTP — associated with VPC | 6 | |
| VPC Route Server in Available state | 7.1 | |
| Two Route Server endpoints in Available state | 7.2 | |
| Two BGP peers created (NSX Uplink VLAN IPs, BGP Keepalive) | 7.3 | |
| Route propagation enabled on Service Access Subnet route table | 7.4 | |
| ODCR created for target instance type in correct AZ (state: active) — recommended | 8 | |
| EC2 vCPU quota sufficient for planned cluster size | 8 | |
| VCF Solution Key procured (core count matches instance type × hosts) | 9 | |
| vSAN License Key procured (110+ TiB) | 9 | |
| Broadcom Site ID available | 9 | |
| EC2 key pair created in target region | 10 |
⚡ Automation: Terraform Deployment
The EVS-PreREQ-Terraform kit automates Steps 2, 4–7: IAM policy, VPC, service access subnet, DNS resolvers, Route 53 records, DHCP options set, and Route Server with BGP peers. Step 3 (IP address planning) requires no AWS resources. Step 8 (ODCR) is included in odcr.tf as commented-out code — uncomment when ready. All defaults match the IP plan in this guide and are production-ready.
File descriptions
| File | Step | What it creates |
|---|---|---|
| variables.tf | — | All configurable values: region, AZ, CIDRs, domain, IPs, ASNs, host maps. Edit this file before applying. |
| main.tf | 2, 4, 5, 6 | VPC, service access subnet, explicit route table, Network ACL (DNS + BGP), DNS security group, Route 53 inbound resolver endpoint (2 IPs), DHCP options set, EVS service-linked role |
| dns.tf | 5 | Route 53 private hosted zone, two reverse PTR zones (Host VLAN + Mgmt VLAN), A and PTR records for all VCF components and ESXi hosts |
| peering.tf | 7 | VPC Route Server, VPC association, two Route Server endpoints in the service access subnet, two BGP peers (NSX Edge uplink IPs, bgp-keepalive), route propagation to the explicit route table |
| iam.tf | 2 | EVSDeploymentPolicy — minimum IAM policy for the user or role that calls CreateEnvironment |
| odcr.tf | 8 | On-Demand Capacity Reservation for i4i.metal — all code is commented out. Uncomment when EC2 vCPU quota ≥ 512 and you are ready to reserve capacity. |
| outputs.tf | — | Prints all resource IDs, IPs, and zone IDs after apply — useful for cross-checking against the EVS Console during bring-up |
| providers.tf | — | Terraform ≥ 1.5 and AWS provider ≥ 5.84 (required for Route Server resources). No remote state — local backend. |
Customizing variables.tf
Open variables.tf and update the following before running terraform apply. The defaults match the IP plan in this guide — change them to match your environment.
# ── Target region and AZ ──────────────────────────────────────────────────────
# All EVS resources must be in the same AZ.
variable "aws_region" { default = "us-east-1" }   # change to your region
variable "az"         { default = "us-east-1a" } # change to your target AZ

# ── VPC & subnet CIDRs ────────────────────────────────────────────────────────
# vpc_cidr minimum /22 — cannot be changed after EVS deployment.
# service_access_cidr hosts the Route Server endpoints and DNS resolver ENIs.
variable "vpc_cidr"            { default = "10.0.0.0/16"  }
variable "service_access_cidr" { default = "10.0.0.0/24"  }

# ── DNS domain ────────────────────────────────────────────────────────────────
# Must match the Route 53 private hosted zone name exactly.
# All VCF components are registered under this domain.
variable "domain_name" { default = "evs.vcloudone.local" }

# ── Resolver IPs ──────────────────────────────────────────────────────────────
# Two static IPs within service_access_cidr.
# These become the DHCP domain-name-servers — must be stable and ordered.
variable "resolver_ip_1" { default = "10.0.0.10" }  # primary DNS
variable "resolver_ip_2" { default = "10.0.0.11" }  # secondary DNS

# ── BGP ASNs ──────────────────────────────────────────────────────────────────
# route_server_asn: VPC Route Server ASN — must differ from nsx_peer_asn.
# nsx_peer_asn: NSX Tier-0 ASN — default NSX value is 65000.
variable "route_server_asn" { default = 65100 }
variable "nsx_peer_asn"     { default = 65000 }

# ── VCF component IPs ─────────────────────────────────────────────────────────
# Must be in the Management VM VLAN (default 10.0.11.x).
# A and PTR records are created for every entry in this map.
variable "vcf_components" {
  default = {
    "cloud-builder" = "10.0.11.9"
    "sddc-manager"  = "10.0.11.10"
    "vcenter"       = "10.0.11.11"
    "nsx-mgr-01"    = "10.0.11.12"
    "nsx-mgr-02"    = "10.0.11.13"
    "nsx-mgr-03"    = "10.0.11.14"
    "nsx-mgr"       = "10.0.11.15"
    "nsx-edge-01"   = "10.0.11.21"
    "nsx-edge-02"   = "10.0.11.22"
  }
}

# ── ESXi host IPs ─────────────────────────────────────────────────────────────
# Must be in the Host Management VLAN (default 10.0.10.x).
# Add or remove entries to match your host count (minimum 4 for EVS).
variable "esxi_hosts" {
  default = {
    "esxi-01" = "10.0.10.21"
    "esxi-02" = "10.0.10.22"
    "esxi-03" = "10.0.10.23"
    "esxi-04" = "10.0.10.24"
  }
}

# ── Reverse DNS zone names ────────────────────────────────────────────────────
# Must match the /24 prefix of the IPs in esxi_hosts and vcf_components.
# Format: third-octet.second-octet.first-octet.in-addr.arpa
# If you change the host or management VM subnet, update these too.
variable "host_mgmt_reverse_zone" { default = "10.0.10.in-addr.arpa" }  # matches 10.0.10.0/24
variable "mgmt_vm_reverse_zone"   { default = "11.0.10.in-addr.arpa" }  # matches 10.0.11.0/24

# ── NSX Edge uplink IPs ───────────────────────────────────────────────────────
# IPs assigned to NSX Edge uplink interfaces during EVS bring-up.
# Must be within the NSX Uplink VLAN (default 10.0.16.x).
# These are configured as Route Server BGP peer addresses.
variable "nsx_edge_peer_ips" {
  default = {
    "edge-01" = "10.0.16.10"
    "edge-02" = "10.0.16.11"
  }
}
Usage
# 1. Clone and enter the repo
git clone https://github.com/gitvcloudone/EVS-PreREQ-Terraform.git
cd EVS-PreREQ-Terraform

# 2. Edit variables.tf with your region, AZ, CIDRs, IPs, and hostnames
#    (see table above — at minimum update aws_region, az, and domain_name)

# 3. Initialize providers (downloads hashicorp/aws ~= 5.84)
terraform init

# 4. Preview what will be created — review before applying
terraform plan

# 5. Deploy (~45 resources, typically completes in 3-5 minutes)
terraform apply

# 6. Review outputs — all resource IDs and IPs are printed
terraform output
odcr.tf file contains a commented-out aws_ec2_capacity_reservation resource for i4i.metal. Uncomment it when your EC2 vCPU On-Demand Standard quota is ≥ 512 and you are ready to reserve capacity before deploying EVS. The reservation uses instance_match_criteria = "targeted" so only your EVS deployment will consume it.
Terraform file reference
# Step 4 — VPC & Service Access Subnet
resource "aws_vpc" "evs_vpc" {
  cidr_block           = var.vpc_cidr
  enable_dns_hostnames = true
  enable_dns_support   = true
  tags = { Name = "evs-vpc" }
}

# Step 4 — Service Access Subnet + explicit route table association
# Explicit association is required — propagated route tables without it
# silently fail to receive BGP routes from the Route Server.
resource "aws_subnet" "service_access" {
  vpc_id            = aws_vpc.evs_vpc.id
  cidr_block        = var.service_access_cidr
  availability_zone = var.az
}
resource "aws_route_table" "service_access" {
  vpc_id = aws_vpc.evs_vpc.id
  tags   = { Name = "evs-service-access-rt" }
}
resource "aws_route_table_association" "service_access" {
  subnet_id      = aws_subnet.service_access.id
  route_table_id = aws_route_table.service_access.id
}

# Step 5 — Route 53 Inbound Resolver Endpoint
# AWS requires a minimum of 2 IPs per resolver endpoint.
# Explicit IPs (not dynamic lookup) ensure stable ordering in DHCP options.
resource "aws_route53_resolver_endpoint" "evs_dns" {
  name               = "evs-dns-resolver"
  direction          = "INBOUND"
  security_group_ids = [aws_security_group.dns_sg.id]
  ip_address { subnet_id = aws_subnet.service_access.id; ip = var.resolver_ip_1 }
  ip_address { subnet_id = aws_subnet.service_access.id; ip = var.resolver_ip_2 }
  tags = { Name = "evs-dns-resolver" }
}

# Step 6 — DHCP Options Set
# domain_name must match the Route 53 private hosted zone exactly.
# NTP uses AWS Time Sync Service (169.254.169.123) — no internet required.
resource "aws_vpc_dhcp_options" "evs_dhcp" {
  domain_name         = var.domain_name
  domain_name_servers = [var.resolver_ip_1, var.resolver_ip_2]
  ntp_servers         = ["169.254.169.123"]
}
resource "aws_vpc_dhcp_options_association" "evs" {
  vpc_id          = aws_vpc.evs_vpc.id
  dhcp_options_id = aws_vpc_dhcp_options.evs_dhcp.id
}

# Step 2 — EVS Service-Linked Role
resource "aws_iam_service_linked_role" "evs" {
  aws_service_name = "evs.amazonaws.com"
}

# Step 8 — On-Demand Capacity Reservation (ODCR) — uncomment to enable
# Requires EC2 vCPU quota ≥ 512 (4 × i4i.metal × 128 vCPUs).
# instance_match_criteria = "targeted" means only launches that explicitly
# reference this reservation ID will consume capacity.
#
# resource "aws_ec2_capacity_reservation" "evs_hosts" {
#   instance_type           = "i4i.metal"
#   instance_platform       = "Linux/UNIX"
#   availability_zone       = var.az
#   instance_count          = 4
#   instance_match_criteria = "targeted"
#   tags                    = { Name = "evs-odcr" }
# }
# Route Server ASN must differ from NSX Tier-0 ASN (default 65000).
# persist_routes prevents route flaps during brief BGP session drops.
resource "aws_vpc_route_server" "evs_rs" {
  amazon_side_asn         = var.route_server_asn  # default 65100
  persist_routes          = "enable"
  persist_routes_duration = 2
}
resource "aws_vpc_route_server_vpc_association" "evs_rs_vpc" {
  route_server_id = aws_vpc_route_server.evs_rs.route_server_id
  vpc_id          = aws_vpc.evs_vpc.id
}

# Two endpoints in the Service Access Subnet.
# EVS reads these endpoint IPs and auto-configures NSX Tier-0 BGP neighbors
# during bring-up — no manual NSX configuration required.
resource "aws_vpc_route_server_endpoint" "ep1" {
  route_server_id = aws_vpc_route_server.evs_rs.route_server_id
  subnet_id       = aws_subnet.service_access.id
  depends_on      = [aws_vpc_route_server_vpc_association.evs_rs_vpc]
}
resource "aws_vpc_route_server_endpoint" "ep2" {
  route_server_id = aws_vpc_route_server.evs_rs.route_server_id
  subnet_id       = aws_subnet.service_access.id
  depends_on      = [aws_vpc_route_server_vpc_association.evs_rs_vpc]
}

# Peer IPs are NSX Edge uplink IPs from the NSX Uplink VLAN (10.0.16.x).
# BFD is not supported for EVS — always use bgp-keepalive.
resource "aws_vpc_route_server_peer" "edge_01" {
  route_server_endpoint_id = aws_vpc_route_server_endpoint.ep1.route_server_endpoint_id
  peer_address             = var.nsx_edge_peer_ips["edge-01"]  # 10.0.16.10
  bgp_options {
    peer_asn                = var.nsx_peer_asn  # 65000
    peer_liveness_detection = "bgp-keepalive"
  }
}
resource "aws_vpc_route_server_peer" "edge_02" {
  route_server_endpoint_id = aws_vpc_route_server_endpoint.ep2.route_server_endpoint_id
  peer_address             = var.nsx_edge_peer_ips["edge-02"]  # 10.0.16.11
  bgp_options {
    peer_asn                = var.nsx_peer_asn
    peer_liveness_detection = "bgp-keepalive"
  }
}

# Propagate NSX overlay routes into the explicitly-associated route table.
resource "aws_vpc_route_server_propagation" "service_access_rt" {
  route_server_id = aws_vpc_route_server.evs_rs.route_server_id
  route_table_id  = aws_route_table.service_access.id
  depends_on      = [aws_route_table_association.service_access]
}
resource "aws_route53_zone" "forward" {
  name = var.domain_name
  vpc { vpc_id = aws_vpc.evs_vpc.id }
}
# Host Management VLAN reverse zone (ESXi hosts — 10.0.10.x)
# Driven by var.host_mgmt_reverse_zone — update if you change esxi_hosts subnet.
resource "aws_route53_zone" "host_mgmt_reverse" {
  name = var.host_mgmt_reverse_zone
  vpc { vpc_id = aws_vpc.evs_vpc.id }
}
# Management VM VLAN reverse zone (appliances — 10.0.11.x)
# Driven by var.mgmt_vm_reverse_zone — update if you change vcf_components subnet.
resource "aws_route53_zone" "mgmt_vm_reverse" {
  name = var.mgmt_vm_reverse_zone
  vpc { vpc_id = aws_vpc.evs_vpc.id }
}

# VCF appliance A + PTR records (cloud-builder, sddc-manager, vcenter,
# nsx-mgr-01/02/03, nsx-mgr cluster VIP, nsx-edge-01/02) — all in Management VM VLAN (10.0.11.x)
resource "aws_route53_record" "vcf_a" {
  for_each = var.vcf_components
  zone_id  = aws_route53_zone.forward.zone_id
  name     = "${each.key}.${var.domain_name}"
  type     = "A"; ttl = 300; records = [each.value]
}
resource "aws_route53_record" "vcf_ptr" {
  for_each = var.vcf_components
  zone_id  = aws_route53_zone.mgmt_vm_reverse.zone_id
  name     = element(split(".", each.value), 3)  # last octet only
  type     = "PTR"; ttl = 300
  records  = ["${each.key}.${var.domain_name}."]
}

# ESXi host A + PTR records — Host Management VLAN (10.0.10.x)
resource "aws_route53_record" "esxi_a" {
  for_each = var.esxi_hosts
  zone_id  = aws_route53_zone.forward.zone_id
  name     = "${each.key}.${var.domain_name}"
  type     = "A"; ttl = 300; records = [each.value]
}
resource "aws_route53_record" "esxi_ptr" {
  for_each = var.esxi_hosts
  zone_id  = aws_route53_zone.host_mgmt_reverse.zone_id
  name     = element(split(".", each.value), 3)
  type     = "PTR"; ttl = 300
  records  = ["${each.key}.${var.domain_name}."]
}
✓ Automation: Prerequisite Validator
The EVS-PreREQ-Validate script uses boto3 to auto-discover every non-default VPC in your account and validate it against EVS prerequisites — no input required. Run it against a manually-built environment or after running the Terraform kit above to confirm everything is wired correctly end-to-end.
Prerequisites
- Python 3.8 or later
- AWS credentials configured (
aws configure, IAM instance role, or environment variables) - boto3 (
pip install boto3) - IAM permissions:
ec2:Describe*,iam:ListRoles,iam:GetPolicy,route53:*,route53resolver:ListResolverEndpoints,route53resolver:ListResolverEndpointIpAddresses,servicequotas:GetServiceQuota,support:DescribeSeverityLevels
Installation & usage
# Install boto3 if not already installed
pip install boto3

# Clone the validator
git clone https://github.com/gitvcloudone/EVS-PreREQ-Validate.git
cd EVS-PreREQ-Validate

# Run against default region (from AWS config / environment)
python evs_validate.py

# Run against a specific region
python evs_validate.py --region us-east-1
python evs_validate.py --region eu-west-1
Expected output
The script runs account-level checks first, then iterates every non-default VPC. Each check prints PASS, FAIL, or WARN. A summary with total counts is printed at the end. The exit code is 0 (all pass), 1 (failures), or 2 (credential error).
================================================================
  Amazon EVS Prerequisite Validator
  Region : us-east-1   Account : 123456789012
================================================================

── Phase 2: IAM
  ✓ PASS  AWSServiceRoleForEVS service-linked role exists
  ✓ PASS  EVSDeploymentPolicy found (arn:aws:iam::123456789012:policy/EVSDeploymentPolicy)
  # FAIL here means the SLR or policy was never created — run the Terraform kit
  # or create them manually before calling CreateEnvironment.

── EC2 vCPU Service Quota
  ✓ PASS  vCPU quota = 512  — meets minimum for 4 × i4i.metal
  # FAIL: quota = 256 — request increase at Service Quotas > Amazon EC2 >
  # "Running On-Demand Standard instances" before deploying EVS.

── AWS Support Plan
  ✓ PASS  Support plan is Business or higher
  # FAIL: Basic/Developer plan — EVS CreateEnvironment will be rejected.
  # Upgrade to Business, Enterprise On-Ramp, or Enterprise.

── VPC Auto-Discovery
    INFO  Found 1 non-default VPC(s)
  # The script skips the default VPC. If you see 0, your VPC hasn't been created.

================================================================
VPC: evs-vpc  (vpc-0f75dd807fc01abb9)  CIDR: 10.0.0.0/16
================================================================

── Phase 4: VPC
  ✓ PASS  CIDR 10.0.0.0/16 meets minimum /22 requirement
  ✓ PASS  DNS hostnames enabled
  ✓ PASS  DNS support enabled

── Phase 6: DHCP Options Set
  ✓ PASS  Domain name = 'evs.vcloudone.local'
  ✓ PASS  DNS servers: 10.0.0.10, 10.0.0.11
  ✓ PASS  NTP = 169.254.169.123 (AWS Time Sync Service)
  # FAIL on domain_name: DHCP domain must match the Route 53 zone exactly.
  # FAIL on DNS servers: printed IPs must match resolver endpoint IPs (see below).
  # FAIL on NTP: 169.254.169.123 must be in the list — no internet required.

── Phase 5: Route 53 Private Zones
  ✓ PASS  Forward zone(s): ['evs.vcloudone.local']
  ✓ PASS  Reverse PTR zone(s): ['11.0.10.in-addr.arpa', '10.0.10.in-addr.arpa']
    INFO  Zone: evs.vcloudone.local  (Z04587343LEL3Z83E8QNP)  records: 14
  ✓ PASS  DHCP domain 'evs.vcloudone.local' matches Route 53 zone
  # FAIL if no forward zone: create the private hosted zone and associate with the VPC.
  # FAIL if no reverse zones: EVS requires PTR zones for both ESXi and Mgmt VLANs.
  # records: 14 = 4 ESXi A/PTR + 8 VCF component A/PTR records — verify count matches.

── Phase 5: Route 53 Inbound Resolver Endpoint
  ✓ PASS  Inbound resolver endpoint(s): ['evs-dns-resolver']
  ✓ PASS    'evs-dns-resolver' — IPs: 10.0.0.11, 10.0.0.10  (status: OPERATIONAL)
  ✓ PASS    Resolver IPs ['10.0.0.11', '10.0.0.10'] are present in DHCP DNS servers
  # FAIL on resolver: create an INBOUND resolver endpoint with ≥ 2 IPs in the VPC.
  # FAIL on cross-check: DHCP domain-name-servers must exactly match resolver IPs.
  # FAIL if status is not OPERATIONAL: resolver endpoint is still provisioning.

── Phase 4: Service Access Subnet & Route Tables
  ✓ PASS  1 subnet(s) across AZs: us-east-1a(1)
  ✓ PASS  Explicit route table(s): ['rtb-0b7c5516a85491e95']
  ✓ PASS  Explicit subnet association(s): ['subnet-003763d6fb9af8fca']
  # FAIL on explicit route table: the main (implicit) VPC route table does not count.
  # A dedicated route table with an explicit subnet association is required so BGP
  # routes propagated by the Route Server are received by this subnet.

── Phase 7: NACL & Security Groups
  ✓ PASS  Custom NACL(s): ['acl-06980e7ddc52a53cb']
  ✓ PASS  Security group(s) with port 53 rule: ['evs-dns-sg', 'default']
  ✓ PASS  Security group(s) with port 179 rule: ['VPCRouteServer-rse-...', 'default']
  # FAIL on port 179: the Route Server auto-creates its own SGs but verify they exist.
  # FAIL on custom NACL: the default VPC NACL does not count — create one explicitly.

── Phase 7: VPC Route Server & BGP
  ✓ PASS  Route Server(s): ['rs-0e8e3f3e2278e29fa']
  ✓ PASS    Route Server rs-0e8e3f3e2278e29fa  ASN 65100  state: available
  ✓ PASS    Endpoints: 2  IPs: ['10.0.0.47', '10.0.0.90']
  ✓ PASS    2 BGP peer(s) configured with bgp-keepalive liveness
  ✓ PASS    Route propagation: 1 route table(s)  ['rtb-0b7c5516a85491e95']
  ✓ PASS    Propagation -> rtb-0b7c5516a85491e95 (explicit route table — correct)
  # FAIL on BGP peers: expected before EVS bring-up — NSX Edge IPs are configured
  #   during CreateEnvironment. This FAIL is normal at pre-deployment time.
  # FAIL on propagation targeting main RT: BGP routes would be silently dropped.
  #   Propagation must point to the explicit route table, not the VPC main table.

── Phase 9: On-Demand Capacity Reservation (ODCR)
  ⚠ WARN  No active i4i.metal ODCR in us-east-1a — create before deploying EVS
  # WARN (not FAIL) — optional until CreateEnvironment is called.
  # Create an ODCR for i4i.metal with instance_match_criteria = "targeted"
  # before deploying to guarantee capacity.

================================================================
SUMMARY  (29 checks across 1 VPC(s))
   27 PASS    0 FAIL    1 WARN

Exit code 0 — environment is ready for EVS deployment.
================================================================